Sunday, June 26, 2011

5 Keys to a Successful Home Renovation

hard hat 300x199 5 Keys to a Successful Home Renovation
Home renovation can be a stressful undertaking. It is wise to deliberate carefully about renovations. All disputes over the renovation plan must be settled before the work begins or you are just postponing an inevitable (and probably heated) argument. Everyone in the family should have a voice in this undertaking, as it truly is a family affair.
The following list could have had three, eight or even 20 entries, but if you stick with the basics and exercise self-control, the following five keys can help guide you to, and through, a successful home renovation.
1. Good relationships mean good business – A home renovation will be a lot less stressful if you have a solid, trusting relationship with your contractor. Trust doesn’t arise between people instantly, but there are ways to speed the process, such as “third-party trust,” meaning referrals. If you don’t already know and respect a builder in your area, ask the people you trust about the contractors that they trust. Get referrals, and interview the prospects to get at least somewhat of a “feel” for them. Get referrals, check credentials, trust your instincts – and call references. Nothing builds trust in a contractor like good, positive reports from previous customers.
2. Accurate budgets are crucial – You need to understand how to budget for the job, and what is really involved, financially, in your home renovation. The better understanding you have of your budget, and the more accurate the estimates you include, the less likely your job will exceed your expectations. Although your contractor can supply some good information here, you should maintain authority over the budget yourself and not give anyone – not your spouse, your family as a whole or the contractor – the “keys to your wallet.” Do your homework, and follow the budget.
3. Home renovation is messy – Prior to the start of actual construction, remove all valuables and breakables from the affected areas. Unless the garage is part of the plan, you might consider storing items there. If the whole house is involved, think about renting a storage unit. While this will cause some short-term dislocation and require some sweat from the family’s brows (or more paid help), renovations are inevitably messy and accidents will happen. Take whatever steps are necessary to ensure the safety of your valuables, fine furniture, Persian rugs and other possessions.
4. Stick to the payment plan – One easy way to ruin your relationship with your contractor, and slow down or terminate your renovation project, is to deviate from your payment plan. If you are developing a timetable for the contractor’s work, you should also prepare, and adhere to, a timetable for the payments. You should be proactive in this matter, and never allow communication to deteriorate to the point where the contractor has to ask for money. Plan out every detail and every dollar, and follow the plan.
5. Extras: There’s always something – When developing your renovation budget, leave some room for the unanticipated extras that inevitably come up in the course of a home renovation. In addition, once you start renovating, you may think of other improvements or changes you wish to make. This means building some flexibility into the financing, as well as the project plan and the timetable. Strike a balance between firmness and flexibility so that you don’t go off on a tangent and lose control of the cost or the schedule.
Like most big undertakings, a home renovation can be somewhat scary. Don’t hesitate to speak with friends, relatives, coworkers or neighbors who have been through the same thing. Investigate all concerns – listen carefully, take notes and don’t leave any question unanswered before finalizing your plan and your budget. Don’t be in a hurry, don’t make assumptions and, above all, do not waver in your determination to see the project through to a successful conclusion

Friday, June 24, 2011

Furnace Duct Cleaning

People who choose to have their heating ducts cleaned tend to do so because their children or other family members are suffering from breathing problems. Air and furnace ducts, when uncleaned, breed mold and mildew and lead to poor air quality. Furnace duct cleaning will also improve the efficiency of your furnace.
Duct cleaning requires not only of the ducts themselves, but of the entire furnace system: the blower, heat exchangers, cooling coils, and condensate pan. When these parts are clean, air flows efficiently through the entire system.
If you or someone in your household is experiencing health problems, and you suspect your furnace air ducts might be the problem, call a duct cleaning company. They can inspect your furnace ducts, and will most likely use robotic video equipment to show you how dirty the ducts actually are. If the video surveillance reveals mold anywhere in the duct system, it’s time to clean your furnace ducts.
Dust and mold can appear to be similar on a scan of the ducts. If the furnace cleaning professionals are unsure, touch a piece of tape to the inside of a furnace duct, and have a lab analyze it for you.
Methods of Cleaning Furnace Ducts
There are several ways to clean furnace ducts. One way is to use an extremely powerful vacuum, which remains in a truck outside. A long hose runs to the furnace area and attaches to the furnace ducts. From the rooms, mechanical brushes, air jet brushes or air snakes pull the dust loose within the furnace ducts.
Another way to clean furnace ducts is with a smaller vacuum unit located inside your house, in the vicinity of the furnace. This vacuum should contain a HEPA exhaust filter to ensure that the dust from the furnace ducts does not fill the air in the room.
A third way of cleaning furnace ducts is to run a rotating brush that is attached to a vacuum nozzle through the furnace ducts.
When selecting methods and services for your furnace duct cleaning, look for quality over cost. A poor quality furnace cleaning job can leave you worse off than before, as it can pull the dust off the furnace duct walls without sucking it all in.
Remember, furnace duct cleaning costs money, so before you sign a service contract, ensure that the company has given you sufficient visual evidence that furnace duct cleaning is necessary. Also, make sure your furnace duct cleaning provider can explain to you in detail how he/she will clean the entire system, not just the ducts. If one component of the system is left uncleaned, it may recontaminate the entire system, defeating the purpose of having put out the cash for the cleaning in the first place. Ask that your furnace duct cleaning provider give you a full duct-length visual inspection after the cleaning is complete, preferably with a camera inside the ducts.

Tuesday, June 21, 2011

OSHA Announces Three Month Phase-In for Residential Construction Fall Protection

The U.S. Department of Labor's Occupational Safety and Health Administration (OSHA) today announced a three month phase-in period to allow residential construction employers to come into compliance with the agency's new directive to provide residential construction workers with fall protection.

The three month phase-in period runs June 16 - September 15, 2011. During this time, if the employer is in full compliance with the old directive (STD 03-00-001), OSHA will not issue citations, but will instead issue a hazard alert letter informing the employer of the feasible methods they can use to comply with OSHA's fall protection standard or implement a written fall protection plan. If the employer's practices do not meet the requirements set in the old directive, OSHA will issue appropriate citations.

If an employer fails to implement the fall protection measures outlined in a hazard alert letter, and during a subsequent inspection of one of the employer's workplaces OSHA finds violations involving the same hazards, the Area Office shall issue appropriate citations.

The new directive, Compliance Guidance for Residential Construction (STD 03-11-002), a detailed description of the phase-in policy, a presentation and other guidance materials about requirements for protecting workers from falls are available at http://www.osha.gov/doc/residential_fall_protection.html.

A Safety and Health Topics Web page, which provides a list of references to help employers identify fall hazards and possible solutions for eliminating such hazards, is available at http://www.osha.gov/SLTC/fallprotection/construction.html


OSHA's On-Site Consultation Program offers free and confidential advice to small and medium-sized businesses in all states across the country, with priority given to high-hazard worksites. For more information, visit http://www.osha.gov/dcsp/smallbusiness/consult.html.

Under the Occupational Safety and Health Act of 1970, employers are responsible for providing safe and healthful workplaces for their employees. OSHA's role is to assure these conditions for America's working men and women by setting and enforcing standards, and providing training, education and assistance. For more information, visit http://www.osha.gov/.

Thursday, June 16, 2011

Using this sales goal template, College City Design-Build’s salespeople build their own year by projecting reachable targets and charting progress. The individual sales plan takes into consideration the salesperson’s capacity, ambition, and desire for income, so the template drives results, says Bjorn Freudenthal, the Lakeville, Minn., company’s vice president of marketing and sales.
Each salesperson is given the same template with a different number of bids, leads, and project types. The template is divided up by month, quarter, and by number of projects and type of project.
Although goals are set at the beginning of every year, Freudenthal meets with each salesperson every two weeks to review leads, bids, and jobs sold and to review sales goals and year-to-date results.
Freudenthal, who developed the template with a local supplier, Charlie Bradburn, the sales manager at Automated Building Components’ millworks division, says it allows salespeople to be more strategic about their performance, which “leads to company buy-in ... . We have people who [see] themselves as owners and manage this form as an owner would ... a P&L.”

Small Bites
The budgeted sales for this individual are $1.3 million. For the first quarter, $325,000 is his sales goal. As of January he had reached $215,000, but he still had February and March to hit the $325,000 mark. He was just 33.8% behind his quarterly goal.
Sales Strategy
Some salespeople lean toward certain types of projects and have an easier time selling those. “But if you say that you want to sell more kitchens,” Freudenthal asks his sales team, “What actions are you taking to do so? Taking workshops, going after prospects, striking up relationships with showroom reps?” This is a way for salespeople to look at their own sales more strategically.
Goal-Oriented
Freudenthal and each sales rep review the document to see if the salesperson is on track and if activity goals and volumes are on target. “If we’re not,” Freudenthal says, “we ask why and [look at] what obstacles are in the way and how can we get to the desired results.”
Make Your Margins
This is your company’s average closed margin, which you put in. After the contract is executed and the project is built, that closing margin is tracked, and that’s the number on the sales template for a particular salesperson. The goal is to have the closing margin be the same as (or better than) the pre-construction margin.
Which Path?
“D/B” is for those design/ build jobs that follow College City Design-Build’s 12-step system. (Small jobs have a lead designer and don’t follow the D/B process.) These numbers are used for tracking.
Suggested Follow-Up
These cover goals and objectives and how best to attain them.

Sunday, June 5, 2011

Move Me

From New Jersey to Florida, Michigan to California and Seattle, remodelers describe their clients the same way: hesitant, indefinite, vague. They have no sense of urgency. They are Internet savvy, researching more, and know their product prices. They want as much remodeling as they can get for as little money as they can spend — and they are going to interview 27 competitors to get it. How are remodeling companies changing their sales processes to reach these new consumers, meet their shifting expectations, and get them to say yes?
A few years ago, many remodelers had gotten off the job-bidding wheel. Now they’re back on it. “There is a lot more competition, and the economy has forced people to do things they would not have done before,” says Dave Mattson, CEO of Sandler Training, in Owings Mills, Md. “It’s last man standing: ‘I’m going to price things insanely low to keep my guys working. You’ll go out of business before I do and I’ll eventually make it up.’ It’s insane, but it makes sense when you’re emotionally involved in the process.”
To combat this competitive attitude, you have to be better organized and have repeatable processes. Bill Tanasse, owner of Key Builders, in Lansing, Mich., has spent the last several months investing time in his sales strategy and working on his sales process. “Clients know there is value to be gained out there, and you have to be sharper. At every juncture, I present myself as a professional. Every process has to be crisp.”

While competing on price can be a death spiral, the distance between price and value has narrowed. “They are attached at the hip,” says Karen Zieba of Zieba Builders, in Long Beach, Calif., who has always “tried to sell value and not cost” to her mostly high-end clientele. Now, she says, “We have to offer good cost in order to get anyone to believe they’re getting value. They need to see they are getting Zieba Builders for what they were going to pay some ‘one-off guy.’”

Strategy Shift

Selling value in this economy might mean changing your marketing strategy and showing clients that you’re willing to work with them in new ways and that you are knowledgeable about products.
While most remodelers are now willing to take on smaller jobs, many companies that never made the margins on those types of jobs are having difficulty marketing their talents. “I don’t want to change my image in the marketplace,” says Sunny Zimmermann, owner of Zimmermann Associates, in Lakeland, Fla., who knows that the perception of his business is that it’s expensive. For Zieba, too, positioning her company is proving to be challenging. As Zieba Builders takes on smaller jobs, she sees her client base shifting from sophisticated consumers for whom quality always trumped price — “They didn’t care what it cost if they got what they wanted,” she says — to more middle-class clients “[who] don’t need the fancy stuff or the extreme appliance package with some obscure product from Istanbul.”
Zieba is targeting different neighborhoods and is sending out small batches of brochures created in-house. She’s trying to position the company as “someone you can trust; your neighborhood contractor; a member of the community; and family-centric.” She is also leading with offers of discounts on cabinetry — something the company hadn’t done before.
It’s a fine line to walk, since marketing materials can be costly. And what happens when the recession subsides? Which clients do you pursue? Which image do you maintain? “We’re at a crossroads,” Zieba says. “What will the economy do for us? There may be more money, but there’s a lot more risk in a premium market.” And she enjoys working with the more midlevel clientele and would like to be able to maintain that market base in the future.
Glen Lumia, president of Creative Design Construction & Remodeling, in Northvale, N.J., has expanded his geographic radius and increased his warranty to five years. He has increased spending on marketing and is doing both “old and new things”: direct mail, door hangers, client parties, educational seminars, donating design services to schools, appearing on radio shows, doing more home shows. He has changed his “package” price, the creature comforts that were built into his base bids. “We’ve peeled back standard features,” he says. “For example, a standard kitchen package includes a double garbage roll-out, lazy Susan, roll trays, tilt blanks at the sinks, three-step crown, undercabinet lighting.” Now, Lumia allows clients at a “challenging price point” to pick items à la carte. Although it’s more difficult to make margins, it brings down the base bid, and clients can always add on.
Lumia is also more open to allowing clients to supply their own materials, such as appliances and tile, but draws the line on plumbing fixtures since the company warranties them. Tanasse doesn’t normally allow clients to do part of their job, but recently finished a project through drywall and, for a consulting fee, is “helping to steer [the clients] in the right direction as they finish it.”
Zieba says that her clients aren’t asking to do parts of their projects, but she does find that she is working harder to seek out products and materials at lower prices for them. She has even found herself abandoning some of her usual vendors. “I recently bought [a shower door] from a new vendor because I almost felt I was being cheated [by the old vendor],” she says.
The Internet has made everyone a crackerjack researcher. “You have to be knowledgeable of the marketplace and keep up to date with the newest products and their costs,” says Tom Barber, owner of Barber Construction, in Roscommon, Mich. “But you have to do a lot of educating. [Clients] go online but they’re skimming things. They don’t have the details to make a good decision. You have to help them make a good decision.”

Overcoming Inertia

Ultimately, any sales process must combat the inertia that is gripping nearly all consumers. “The biggest challenge for [remodelers] is to create urgency,” Zieba says. And there are good reasons for homeowners to invest in their homes.
“I emphasize that commodity prices are low. There is real value to be gained right now in the industry — labor prices and material prices are at record lows,” Tanasse says. “You couldn’t pick a better time to do this project.”
Individual remodelers need to work on telling their story. “We got caught in our comfort zone. We became successful and the economy made us successful. Now we have to go back to the things we used to do to survive and thrive earlier on,” Mattson says. “Just saying, ‘The value of my workmanship sells,’ doesn’t work anymore. Thinking, ‘I don’t have to do all that stuff I learned at [sales training]’ doesn’t work anymore. Sometimes you have to go backward to move forward.”

Tuesday, May 31, 2011

Press On

Ten years ago, Chris Dreith, owner of The Home Improvements Group, in Woodland, Calif., couldn’t find a local publication in which to advertise. As a member of the SEN Design Group (a kitchen and bath industry buying group), she was introduced to the nationally distributed Signature Kitchens & Baths magazine. “I think I’ve gotten a job [from] every spread I’ve ever [placed in Signature], and I’ve been doing it at least 10 years,” says Dreith, whose company does design/build remodeling.

Think National, Work Local

Signature Kitchens & Baths, which publishes projects from any designer or builder (you don’t have to be a SEN member) as long as the project is attractive and the photography professional, is basically an advertising vehicle. Sold for $14.95 at bookstores and newsstands, the magazine is a four-color glossy with some editorial as well as submitted projects accompanied by staff-written advertorial. Each issue contains a buyer’s guide. A two-page spread is a $2,595 investment, and featured remodelers receive 160 copies of the publication.
Another, similar publication, is Home & Remodeling Trends. Also sold at bookstores, the full-color magazine is structured like a book with a table of contents and chapters. Advertorial is staff written and photographed. Although nationally distributed, clients pay a local or regional rate of $3,100 per page. Stories are repurposed online and get a unique URL; featured remodelers receive 20 copies. The magazine also will create e-brochures or printed brochures for clients.

So how can a national publication work for you?
Image
Credit: David Sharpe
Remodeler Chris Dreith uses Signature Kitchens & Baths in several ways. The magazine functions as an extension of her showroom for clients to get ideas. “Each spread is actually someone’s home rather than a photo that promotes a particular product,” she says. “Clients start to learn the terminology of K&B remodeling … and it [also] helps me get to know what they don’t like.”
Dreith leaves copies of SK&B in doctors’ waiting rooms, salons, and high-end fitness studios. She even left a copy in a local bookstore, which displayed it with a sign noting that a local designer was featured on page “x.”
Other remodelers have used publication of their work inSK&B as a way to goad architects into working with them or as an entry into putting on remodeling seminars.
Brad Cruickshank, of Cruickshank Remodeling, in Atlanta, is often featured in Home & Remodeling Trends and says he gets “a really good response from the custom booklets Trends puts together.” He delivers them to prospects before the initial meeting and finds that clients are passing them on to their neighbors

Sunday, May 29, 2011

Major Overhaul: Address Weaknesses in Your Business

Mike Majors was stuck. Back in 2004, Majors Home Improvement, in Milton, Fla., had produced an annual revenue of around $1.2 million each year for several years, but Majors wanted to grow the business. Since he wore all the hats — sales, marketing, scheduling, production, human resources — as well as lead the company, he couldn’t dedicate the time to make the sales happen. Then, a series of hurricanes forced him to make dramatic decisions.
“Because of the hurricane damage, leads were starting to come in fast, but I couldn’t handle them because I was handling everything,” he says. “I had to make a change.”

Know Your Limitations

Majors decided to add staff. First he identified his own weaknesses: marketing and selling. “I could close sales but that was ... because my name was on the company,” he says. “If I was serious about growth, I needed good salespeople.” He was determined that once he hired good people he would maintain the revenue needed to keep them.
“I never ran help-wanted ads because I don’t want people who are looking for work; I want people who are successful in their current position,” Majors says. He spread the word, and a mutual acquaintance introduced him to Jonathan Wells, then working in a local advertising agency. With an MBA and years of experience in direct-response marketing, Wells turned out to be a great fit.
Next, Majors focused on sales. Again, mutual friends told him about Chuck Mepham, another MBA who had proven his sales success in years with Sears. Today he is Majors Home Improvement’s sales manager.

Let Go

In 2005, the company grew to $3.2 million and both new team members earned significant compensation. Now that the hurricanes are a thing of the past, volume has dropped but is significantly higher than before Wells and Mepham joined the team.
It wasn’t easy for Majors to hand over control of two major areas of the business. “It was difficult to give the responsibility,” he says, “but I think that the fact we were so busy and I had so much to focus on forced me to let go.”
Majors still keeps his finger on the pulse of the company with daily lead, sales, and production reports, and his key managers have earned his confidence. “Now, while they may run some things past me, I trust their judgment and know that they are better at their jobs than I ever was. This confidence lets me focus on other important aspects of the business.”

New Law Will Save Big Bucks for Small Businesses

A bill was sent to President Obama’s desk yesterday that repeals a small part of his own healthcare legislation. However, if it becomes law, it will make life a little easier for remodelers, contractors, and any other small business that uses its fair share of vendors.
By a vote of 87 to 12, the Senate approved the Small Business Paperwork Mandate Elimination Act of 2011 on April 5. The law repeals a burdensome tax paperwork requirement that was part of the Patient Protection and Affordable Care Act approved last year. This would have mandated that starting next year businesses would be required to file a 1099 for every vendor that provided more than $600 in services or goods throughout the course of a year.
The annual $600 limit was for all vendors so contractors would find themselves sending out a stack of 1099s not just for their subs and vendors but also for mundane purchases such as coffee, office supplies, and even fuel.
No doubt the requirement — had it become a law — would have meant that businesses would have to spend resources on accountants and bookkeepers to adhere to the rule rather than on expanding their operation in a more meaningful way.
Aside from eliminating the 1099 requirements, the new potential law also repeals a component in the Small Business Jobs Act of 2010 that stipulated that as of Jan. 1, 2011, landlords had to submit 1099s to vendors that supplied them with more than $600 of services.
Contractors, remodelers, and other small businesses can continue sending out 1099s as they have been in the past based on the IRS’s reporting procedures.
www.StoreForParts.com

Friday, May 20, 2011

The State of the Kitchen & Bath Industry

At the recent Kitchen & Bath Industry Show (KBIS) in Las Vegas, Karen Strauss, president of the Masco Cabinetry Group (which includes KraftMaid, Merillat, and Quality) in Ann Arbor, Mich., addressed a group of professionals about the state of the industry.
Strauss offered suggestions on how designers and remodelers can survive in today’s tough market.
First, she urged professionals to face reality. Kitchen and bath sales are down 30% since 2006, she said, but even with a few small rises in consumer confidence, the market is still “bouncing along the bottom.” Though the unemployment outlook has improved, professionals need to pay attention to the quality not just the quantity of new jobs on the market. With a 75% decline in sales of new homes, that market continues to be a “roller-coaster ride,” Strauss said, and tight credit will continue to affect these sales. All of these factors mean the rest of 2011 will be volatile and consumers will be reluctant to spend money on their homes.
However, there are reasons for optimism. With the low availability of new homes, as foreclosed houses are processed through the market, the need for homes will increase. Foreclosures also offer an opportunity for repair and remodeling — especially in kitchens and baths. Three positive factors that will influence the market are an increase in household growth, immigration, and the second-home market.
Strauss pointed out that K&B designers and remodelers are competing against other big-ticket consumer items such as vacations, so they need to “create a compelling reason to buy in our category.”
Reaching Today’s Consumers
In her presentation, Strauss stressed that the industry also needs to find out what today’s consumers want, citing some statistics that could help to define today’s top buyers. She said that homeowners see their kitchen as an experience and a “lifestyle support tool for what matters” to them.
And today’s consumers are the ones who control the message — they don’t wait for retailers to “push the message out to them.” They are connected in ways that most retailers never imagined. Strauss said that consumers:
• Want to participate in the conversation and be an equal partner in the process
• Are more likely to include their friends’ opinions in their decisions
• Want designers to bring them solutions worth splurging on
And, she added, there are 200 million blogs online, and consumers are using resources like this to make purchase decisions online — before they even set foot in a store. With all these changes, it’s important that the industry finds a better way to reach consumers from a distance, including phone applications and mobile sites. Strauss pointed out that the better you know your customer, the better you’re equipped to reach them, which means not just knowing their demographics but also their psychographics. She cites the example of a researcher who defines the ideal customer of Trader Joe’s grocery stores as a “Volvo-driving professor who could be CEO of a Fortune 100 company if he could get over his capitalist angst."
Designers need to ask their clients about the key triggers that prompted them to renovate a kitchen or bath. In addition, designers need to be innovative and inspire their clients. “No one cares about your products, they only care how your products will improve their lives,” Strauss said.

Wednesday, May 18, 2011

Having choices is essential to business agility

The economy shows signs of picking up momentum, yet unemployment, housing values, and world events remain unsettled. Funding is still elusive for our businesses and our clients, yet banks are reportedly hoarding cash. We are seeing more activity than we have since the fall of 2008 (yes, the double meaning is intended), but will it translate into actual revenue?
Mixed signals and uncertainty create more personal and business stress than times of clear direction. Is it better to hold onto our cash and live to fight another day? Or is it prime time to risk investing to gain market share and get a leg up on our competition? We all have responsibilities — to ourselves, our families, our teams, and our clients — and investing in the wrong areas at the wrong times could spell disaster.

Finding Options

In times like these, having all my chips on one uncertain investment or direction is too risky for my taste. I like options. I want to seize opportunities as they arise, but I also want the flexibility to pull back if those opportunities lose momentum. Think “nimble” — a mouse dancing in the moonlight.
Diversified services. Options come from looking at our business as a “portfolio” balanced to suit our appetite for risk. Large, design-intensive renovations such as additions, kitchens, and master bedroom suites offer great returns in good times, but they dry up quickly when clients are forced to focus on need-based projects and repairs.
To balance this risk, we try to serve our clients regardless of project size. Our smallest project last year was $78; our largest was more than $700,000. We have also balanced our business portfolio by offering services beyond just home remodeling.
Variable costs. Options come from making our costs as scalable as possible. We have blended more independent contractors with in-house labor over the last two years. We are using more temps in the office to fill short-term needs, and we have outsourced more elements of our business, such as payroll, hosting services, and graphic design. Hedging our decisions through investments in variable, rather than fixed, costs allows us to be nimble.
Team effort. Options come from transparent communication with a committed team. My goal is to have the entire team on the lookout, not only for risks and new opportunities but for creative reinvention strategies as well. To achieve that goal, they need the authority to think creatively, which requires knowing where the company is heading and understanding the decisions we make. And they need to be committed — to doing what’s best for the business, to breaking out of traditional boundaries, to wearing multiple hats. Team members need to become “utility players,” adding value in myriad positions.
Every business is affected by forces that it cannot control — competition, the economy, even the weather. Effectively positioning around these externalities, especially in such uncertain times, is a competitive advantage. We are following the path of flexibility through options — a mouse dancing in the moonlight.


Monday, May 16, 2011

Selecting and Designing a Home Remodeling Project

Embarking on a home remodeling project is an exciting and creative process. When considering your home remodel, take time to imagine, brainstorm, and plan.
 
Design ideas can be found in lifestyle magazines, online, and from experienced professional remodelers.
 
While researching ideas for your home remodel, think about some of the most popular room requests remodelers receive from customers.
 
Kitchens
No resource on home remodeling would be complete without a discussion of the most talked about room in the house--your kitchen. You may want to replace aging cabinetry, modernize appliances, update the style of your kitchen, or improve the floor plan for better flow. Today's home remodelers are experts in creating efficient kitchen layouts.
 
Bathrooms
Following a remodel, home owners can enjoy a spacious and more lavish bathroom. Possible bathroom elements include modern cabinets, multiple vanities, and differently shaped showers.
 
Bedrooms
Dreaming of a master bedroom suite? Home remodeling can update cramped and dark bedroom spaces, or refresh a child's bedroom into a more sophisticated space. Consider these questions:
  • What will you use the room for?
  • What other types of furniture do you want to include?
  • Do you have adequate storage?
  • Do you need an office or study space?
  • Do you need space for overnight guests?
Other Remodeling Options
Home remodeling projects are practically limitless. Don't fear creative thinking and soliciting others for advice. Here are some other potential remodeling ideas:
  • Home Office--If you're self-employed or a telecommute, you may need an efficient office space in your home. Think about the type of work space you need, including equipment, meeting space, furniture, lighting, and your preferred working conditions.
  • Vacation or Second Home--You may want to turn a weekend retreat into a more permanent residence. What type of renovation work needs to be done to create a comfortable living environment year-round?
  • Recreation Areas--Home owners are increasingly interested in spaces for recreation and socializing. Do you want to add a home theater, exercise room, library, sound system, or other features to enjoy recreationally?
  • Closets and Storage--When you assess your need for storage, look beyond closets. Every room in your house has the potential to deliver needed organization and structure. Maximizing all your space will help manage your storage needs.
  • Household Systems--Home owners are increasingly remodeling to improve energy efficiency. Traffic flow and floor plan improvements are another popular consideration. And others remodel to install security systems.
  • Remodeling for Accessibility--One reason for remodeling is the need to make room for an aging family member or person with a disability. Consider the needs of the individual, talk with them, and investigate solutions using universal design.


Tuesday, May 10, 2011

NuTone Security Cabinets Protect Against Identity Theft

According to the Federal Trade Commission (FTC), an estimated nine million Americans are impacted by identity theft each year. Victims of identity theft may spend months or more repairing the financial damage that occurs when their personal documents or credit information is stolen.
To help prevent identity theft, the FTC recommends storing personal information in a secure place in the home. NuTone® Recessed Security Cabinets provide an option to inconspicuously protect valuables and personal documents in the home without the hassle and cost of a cumbersome safe.
“If a break-in occurs, not only do homeowners risk losing their valuables, they also face the threat of identity theft as a result of personal documents being taken from the home,” says Julie Allongue, marketing manager, storage solutions, Broan-NuTone®. “To help prevent such a loss, a NuTone Recessed Security Cabinet can be installed anywhere in the home where a little peace of mind is needed.”
Perfect for storing and organizing legal documents, extra keys, credit cards, identification, medication and jewelry, NuTone Recessed Security Cabinets are easy to install and fit between standard stud distances, allowing them to be located anywhere in the home. Intended for a discrete location, the cabinets are ideal for use in the laundry room, closet, home office, work shop or anywhere extra security is needed. In addition, the cabinet door comes with a white heat-cured paint finish that can easily be painted or covered in wallpaper for enhanced concealment.
NuTone Recessed Security Cabinets are offered in two models, the Standard and Deluxe, as well as a smaller lock box that can be mounted in the wall and also fits in medicine cabinets with at least a 14-inch inside width for an added component of security. The cabinets and lock box feature a 14-gauge painted steel door, a rust-resistant painted steel body, a cylinder locking mechanism and concealed welded piano hinges to deter tampering. The cabinets also feature adjustable tip-resistant shelves and a reversible left- or right-hand door opening. Unique to the Deluxe Recessed Security Cabinet are a key/jewelry rack, a padded jewelry tray compartment and a document holder.
The Standard cabinets are available in an overall size of 16 inches wide by 26 inches high by 3 ½ inches deep, and the Deluxe cabinets are available in an overall size of 15 inches wide by 18 inches high by 3 ½ inches deep or 15 inches wide by 26 inches high by 3 ½ inches deep. The lock box has an overall size of 13 ¼ inches wide by 5 1/8 inches high by 3 ½ inches deep.  Additionally, NuTone Recessed Security Cabinets are manufactured and customer-supported in the United States, making NuTone the ideal brand for Americans looking for ways to contribute to strengthening the economy.

Monday, May 2, 2011

Remodeling Market Index Reaches Highest Level in Four Years

According to the National Association of Home Builders' (NAHB) Remodeling Market Index (RMI), the remodeling market is heading into recovery with an increase to 46.5 in the first quarter of 2011 from 41.5 in the fourth quarter of 2010. This marks the highest level for the RMI since the fourth quarter of 2006. An RMI below 50, however, indicates that still more remodelers report market activity is lower (compared to the prior quarter) than report it is higher.

The overall RMI combines ratings of current remodeling activity with indicators of future activity like calls for bids. Current market conditions for the first quarter of 2011 rose to 46.1 from 43.3 in the previous quarter. Future market indicators climbed to 46.8 from 39.7 in the previous quarter.
"Remodelers report a jump in activity so far this year and have been receiving more calls for work and appointments," said NAHB Remodelers Chairman Bob Peterson, CGR, CAPS, CGP, a remodeler from Ft. Collins, Colo. "However, many home owners are still slow to commit to remodeling due to feeling uncertain about the economic recovery and difficulty obtaining loans."
Regional break downs for current remodeling market conditions showed growth in all but one area: Northeast 46.1 (from 38.8 in the fourth quarter), South 46.1 (from 45.8), and West 46.1 (from 39.7). Only the Midwest experienced a decline to 47.1 (from 54.3).

All current remodeling market indicators increased: major additions to 50.3 (from 48.6 in the fourth quarter), minor additions to 48.0 (from 43.9), and maintenance and repair to 39.5 (from 37.0). Future market indicators also improved across the board: calls for bids rose to 53.1 (from 47.2), appointments for proposals to 52.4 (from 43.1), backlog of remodeling jobs to 49.7 (from 42.6), and amount of work committed for the next three months to 32.1 (from 25.9).
In an additional special question remodelers reported the top reasons prospective customers are holding back from remodeling their homes:
Customers think it is hard to get financing (90 percent of remodeler respondents)Customers have lost equity in their homes (81 percent)Customers are uncertain about their future economic situation (74 percent)Reluctance to invest in home when not sure home will hold its value (67 percent)Negative media stories making customers more cautious (62 percent)Inaccurate appraisals are making financing more difficult (54 percent)
"Home remodeling continues to slowly increase and continued growth through the year is expected." said NAHB Chief Economist David Crowe. "The fact that some indicators are breaking 50 means remodelers are seeing improving activity in their markets. While credit scarcity and economic uncertainty continue to weigh down remodeling, signs of increasing consumer interest are promising."

Thursday, April 28, 2011

Broan Range Hoods Fuses Classic Style With Modern Performance

What emerges when performance, durability and tradition are combined into one kitchen ventilation product? The result is the new, expertly crafted WT32 Series of Chimney Hoods, from BROAN®, which is intelligent and
high-performing in its execution and elegant and classic in its traditional Italian-inspired design.
In response to the current economic climate, Broan has created a value-engineered entry-level chimney hood, without sacrificing style and performance. As part of the BROAN Colonne Suite of cooking ventilation products, the WT32 chimney hood is a robust expression of Italian style that pays homage to the classic Roman Architecture. Both striking and simple in design, this range hood gives new meaning to the idea of achievable luxury.
"Modeled after one of our most popular designs, the WT32 chimney hood is perfect for today's upscale residential kitchens," says Brian Wellnitz, marketing manager, kitchen ventilation, Broan-NuTone®. "We are proud to offer our consumers a luxurious, durable, long-lasting product that is more accessible. Featuring modern controls, lighting and automatic heat detection and stunning Italian-inspired craftsmanship, the WT32 Series can adapt to both modern and traditional kitchen designs. As with other Broan range hoods, even with the latest technologically advanced control features, it still remains a very user-friendly ventilation solution.
The new WT32 range hood has a unique four-speed electronic push button control with translucent blue backlit indication that allows the user to easily determine which speed has been selected. Additionally, it includes a delay timer that automatically shuts off the range hood after five minutes to ensure all cooking contaminates have been evacuated from the kitchen and will indicate when it is time to clean the filters.
"In conjunction with the Broan damper, the WT32 series helps decrease indoor air pollution by restoring fresh air in the home every time the chimney hood is used. As indoor air quality is more and more of a concern for homeowners, Broan continues to offer top of the line, stylish range hood options, helping to eliminate unwanted odors and indoor air pollutants to ensure a healthier home. The WT32 chimney hood might derive its style from ancient Rome, but its function and features are distinctly modern," says Wellnitz.
The durable, brushed stainless steel chimney hood models are available in 30-, 36-, 42- or 48-inch widths and a 22-inch depth. The models are equipped with powerful Pro 600 CFM or Super Pro 1,200 CFM blowers engineered for optimal function and whisper-quiet operation.
Additional features of the Broan WT32 Series include:
  • Brilliant halogen cook top lighting: two 50-watt bulbs in the 30- and 36-inch model widths and three in the 42- and 48-inch model widths
  • Dishwasher-safe, quick-release, stainless steel and mesh filters
  • Optional non-ducted recirculation kit available with 30- and 42-inch width hoods when outdoor venting is unavailable
  • The Heat SentryTM system, which automatically detects excessive heat and adjusts blower speed accordingly


Monday, April 18, 2011


What does CFM mean?
CFM is the acronym for Cubic Feet Per Minute - the measure of air volume moved by the fan blower. Choose a fan with a CFM rating appropriate for your room size to ensure adequate ventilation.
What is a Sone, and how is it measured?
A Sone is a measurement of sound in terms of comfortable hearing level for an average listener. The lower the sone value, the more comfortable the listening environment. Sones are not decibels or volume, but rather how sound is "sensed". One sone is the equivalent of a quiet refrigerator.
What is continuous ventilation?
Continuous ventilation provides today?s airtight homes with a relatively constant and controlled lower level of ventilation.
Can I mount fans above my tub and shower?
Most fans are rated for use over a shower or bathtub with a GFCI (Ground Fault Circuit Interrupter).

Can my ceiling fan be surrounded by insulation?
Yes. Bath fans are designed to provide adequate cooling for motors and lighting, as well as products with integral heaters.
Will fans work in wall-mount applications?
Some bath and utility fans may be wall mounted. See the spec matrix for specific models. Improper installation may affect fan life, safety and your warranty.
Will a ceiling fan or wall-mount utility fan serve as a range hood?
No. Range hoods are specifically designed to handle grease and high temperature environments. Ventilation provided by NuTone fans is only a supplement for odor and moisture removal in the kitchen.
What does "static pressure" mean?
Static pressure is the measurement of airflow resistance as it is pushed through ductwork which reduces the effectiveness of the fan. Learn more on the Home Ventilation Institute web site www.hvi.org.

How long should a bath fan run after a shower is used?
The Home Ventilation Institute recommends that a fan should be left on for 20 minutes more to clear humidity adequately and to ensure moisture and condensation in the fan body or ducting is minimized.
What should I do if I can't wait for moisture to clear, but I don't want a fan to run all day long.
Sensing fans that detect the humidity rise caused by a shower and turn on automatically, when moisture has cleared it turns off. Some wall controls also give you the option of humidity sensing, or timer control. Just set it and forget it.
What are the timer features?
Delay-off timers automatically shut your fan off after a specified time interval. It?s a nice feature in high traffic bathrooms where you may wish to let the fan run to clear moisture adequately. A timer counts down the minutes of fan operation selected by the user.
Where should the exhaust fan be located?
Exhaust fans should be located in or near the shower or tub, and in an enclosed water closet. Keep exhaust points opposite the supply air source to ensure that the fresh air is drawn through the room. Bathroom doors should not be sealed too tightly at the bottom in order to allow "makeup air" to enter the room when the door is closed.

Where is the exhaust outlet on the ventilation fan?
The exhaust outlet is the point where air is discharged through the body of the fan housing into the ductwork. During installation, orient your fan with the exhaust outlet pointing toward the exit vent on your roof or wall to minimize turns in ductwork that impede airflow.
Why do the windows and mirrors fog even when the fan is running?
If windows and mirrors are very cold, condensation can still form on these surfaces. And if your bathroom is sealed tightly, replacement air may not be entering the room fast enough to displace the moist air. Be sure to undercut your door sufficiently to draw fresh air into the room. Fan placement can also be a factor. Your fan should be located far from the replacement air source to ensure the moist air is drawn out first. Finally, too many twists and turns in the ducting will significantly reduce the ability of the blower to remove moist air. Make sure your ductwork is as short and straight as it can be, with gradual turns rather than tight corners where necessary.
Why is water dripping from the grille of the fan?
Dripping water is either condensation (usually due to cold ductwork or improper duct installation), or a problem with the seal on a wall or roof vent. Insulated ductwork can help solve condensation problems, and running the fan longer will ensure moisture is completely removed from the duct. Ductwork should slope down toward a wall vent to direct condensation out of the exterior vent opening rather than back into the fan housing.
Can I install a heater over the bathtub or in a shower?
No. Heaters are not UL Listed (Underwriter's Laboratory) for installation over a bathtub or in a shower.

Can I use an inline or multi-port fan in one large bathroom?
Yes, this works the best for large rooms because you can install the ports over the areas where the ventilation is needed the most (source control). The size of the multi-port would be determined by the size of the room.
Does a duct-free bath fan expel air?
No. A duct-free fan is not a ventilating device. It does not remove air from the room.
What type of exhaust fan is recommended for hot tub areas?
A high CFM rated device is normally recommended for this type of application.
Can I use a smaller diameter duct than what the fan is designed for?
This is not recommended. It will cause the fan to run harder, greatly reducing the CFM performance of the fan and create excess noise.

Can larger diameter ducting be used with my bath fan?
Yes, larger diameters will result in improved performance.
What type of duct is recommended, rigid or flexible?
It is recommended, where possible, to use rigid duct. It has less resistance to air flow and allows the fan to operate much more efficiently. If flexible duct is used, be sure the duct is as straight as possible.
Can I exhaust my fan into my attic instead of out the roof or wall?
Never exhaust air into spaces within walls, ceilings, attics, crawl spaces or garages. The humidity may damage the structure and insulation.
What type of exhaust fan is best for a sauna or hot tub area?
High CFM-rated devices are normally recommended for this type of application.

Can I use a fan in a steam shower?
No. Since these are normally sealed chambers, a vacuum will be created.
Can I vent more than one bath fan out of a roof or wall cap?
No. Always follow the manufacturer's recommended ventilation requirements.

Thursday, April 14, 2011

Upgrade Kits

Broan Bath Fan Upgrade Kit

Broan Bath Fan Upgrade Kit
 
Do you have an old, ugly, noisy, worn-out Broan or Nutone bath fan?  Now it's easy to replace the old bath fan with Broan's Model #690 Bath Fan Upgrade Kit.  The upgrade kit will move more air and is quieter than the old model too.
Features
  • No re-wiring
  • No new duct work
  • No hassels
  • New motor (60 CFM and 3.0 Sones) reduces sound up to 50%, improves air movement up to 20%, and helps control humidity that causes mold and mildew
  • New grille - Upgrade your bathroom's look with a modern white grille (can be painted)
  • No special tools are required - kit includes everything you need
  • Two motor plates included to fit most economy fans

Broan 690 Upgrade Kit replaces the models below:
If your grille looks like this:
 
The fan is very likely one of these models:
 
Housing Dimensions:
Broan
670, 671, 688, 689

Nautilus
N671, N688

7-1/2"x7-1/4" only
* 8" x 8-1/4" are not compatible

NuTone
693, 695, 696N
7-1/2"x7-1/4"
or
8"x7-1/4"

Broan 690 Upgrade Kit replaces the models below:
If your grille looks like this:
 
The fan is very likely one of these models:
 
Housing Dimensions:
Broan
670, 671, 688, 689

Nautilus
N671, N688

7-1/2"x7-1/4" only
* 8" x 8-1/4" are not compatible

NuTone
693, 695, 696N
7-1/2"x7-1/4"
or
8"x7-1/4"
More Information:

  • Model: 690
  • Manufactured by: Broan

Tuesday, April 5, 2011

Fixing That Old Attic Fan

Whole house or attic fans are a wonderful thing to have and often replace air conditioning units for people in climates where the evenings are cool in the summer. When the attic fan is working properly, it provides an air exchange for the entire house and encourages breezes to flow freely through the rooms. If the fan has stopped working, you may think you have to call in a repairman, but the job may be simple enough to do yourself.

things you'll need:
Screwdriver
Voltage sensor
Extension cord
Electric light
Parts as needed

1
Identify the problem. This may sound simple enough, but the way you proceed depends heavily on the source of the problem. Many fans have either motor malfunctions or troubles with a thermostat.
2
Diagnose electrical problems with an extension cord. If your fan plugs into a standard outlet, simply bring an extension cord and a small lamp up to the attic with you. Keep the extension cord plugged into another outlet, plug the fan into it and see what happens. If the fan works, then you've probably got an electrical problem. Try plugging the lamp into the outlet dedicated to the fan; if it doesn't work, you've identified the problem.
3
Check the thermostat. Many attic fans stop working because of a problem with the thermostat. If your fan has an "off/on" switch that can bypass the thermostat, try that and see if the fan turns on. If it does, you've found the problem. If it doesn't have that option, remove the thermostat to see if the fan still functions. Be sure to disconnect any electricity at this point.
4
Get the right parts for the job. If you've diagnosed a motor or thermostat problem, you should be able to get the parts at StoreForParts.com.
5
Replace the parts. Once you've got the parts, you can easily follow the manufacturer's instructions for replacing the problem part.

Remember that your fan is an electrical appliance. Use every precaution when dealing with electrical items and turn off the electricity from the circuit breaker whenever you are working on them. Check your paperwork for a warranty before you begin your repair. Your fan's problem may be covered and you may get a free replacement part, service or even a new fan if yours is still covered. Check your prices; sometimes it's cheaper and easier to replace the fan than it is to repair it.

While doing it yourself is very satisfying, you don't want to pay more for the parts than you would to get a brand new fan.If your problem is within the electrical system of your house and you don't have experience with wiring, seek professional help. Electrical work can be tricky and dangerous and if you feel you are in over your head, you probably are

Tuesday, March 29, 2011

If your trash compactor's motor is working but the machine won't flatten your trash, you could have a broken or stretched drive chain or drive belt. Tightening the belt or replacing it is a snap.

Instructions


WHAT YOU'LL NEED


  • Replacement Drive Belt Or Drive Chain
  • Nut Driver And Socket
  • Screwdriver
  • Socket Wrench And Socket
  1. Unscrew the compactor from your kitchen counter, using a screwdriver. 
  2. Lay the unit on its side and locate the drive chain or belt. It will be under a cover plate on the top or bottom of the machine.
  3. Remove the cover plate, using a nut driver and socket. You'll see the drive gear, one or more power screw sprockets, and a drive chain or drive belt.
  4. Inspect the chain or belt. If it appears slack, you just need to increase the tension as explained in step 
  5.  If it's broken, buy a replacement at an appliance store, then go on to step 6

    Loosen the motor mount bolts, using a socket wrench and socket (see A). Then push the mount toward the power screw sprocket(s). This will make it easier to fit the new chain or belt in place.


  6. Slip the chain or belt over the sprockets (see B). On trash compactors with two power screws, you may have to unbolt the power screws from the frame and slide them out of the unit a bit to install the chain or belt.
  7. Push the motor mount away from the power screw sprocket(s) to increase the tension on the drive chain or belt. Tighten the motor mount bolts and check the tension. You should have no more than 1/2 inch (12 mm) of flex. Loosen the bolts and increase the tension again if necessary.
  8. Reinstall the cover plate, and screw the compactor to the counter.

Friday, March 25, 2011

How to Clean a Range Hood


How to Clean a Range Hood Filter


Avoid household fire hazards, and keep your range hood and fan doing what they are supposed to do! Cleaning your range hood is an important part of kitchen cleanup!

Instructions


things you'll need:


  • tri-sodium phosphate
  • Stiff wire brush
  • rubber gloves
  • soaking bucket
  • cleaning rags

  1. Remove the fan filter from the range hood fan. You can also remove any light covers, knobs, etc. that need to be cleaned.
  2. Fill a bucket or some other container with enough hot or boiling water to cover the filter (and/or other parts), when placed inside.
  3. Put on your rubber gloves and add the recommended amount of tri-sodium phosphate to the water. Mix and place the fan filter in the bucket with the mixture. Let soak for about 1 hour.
  4. After soaking, remove the dirt and grease from the filter by scrubbing with a stiff wire or other type of sturdy brush.
  5. Prepare additional cleaning solution with the tri-sodium phosphate and water. Use your cleaning rags and the brush to wash the range hood thoroughly. The tri-sodium phosphate will cut the grease and make cleaning a breeze
  6. Rinse and dry all cleaned surfaces, and replace the range fan filters and parts.

Thursday, March 24, 2011

How To Replace a Bathroom Grille


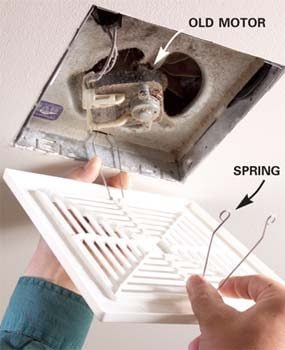
In this video clip we will be replacing a bath fan grill. In this bathroom we have a ventilation fan located on the ceiling. Now there's an old 1980's yellow colored grill covering this fan. In addition to it being old and yellow there is a lot of dust and other types of debris that have collected in it over the years. We're going to be replacing this with a new clean grill. Our first step is to pull the grill straight down. It's attached by springs and you'll pull down and you'll be able to pivot it. Next we will need to disconnect our spring. There's a spring on both sides so make sure you take both of those off. After that we need to vacuum out our fan unit. After that we can put our new grill in place and push it straight up. That one looks much better than the old one and it should function a lot better because we did vacuum that out as well.


Monday, March 21, 2011

How to Repair a Door Chime
Repair a Door Chime
 

If your door chime no longer provides the familiar tones and merely hums or buzzes, you can probably fix it without too much trouble. Try this before replacing it.

Steps
1
Remove the cover of the chime unit. Many times this cover will just hang on some tabs and can be removed by lifting it straight up. Other types may require that screws be loosened or removed.
2
Look for obviously broken or missing parts. Reinstall if possible. Springs and plungers are basically the only moving parts for electro-mechanical chime units.
3
Tighten electrical terminal screws. Most units operate at 24 volts or less, and should not pose a shock hazard. You can determine this by looking at the wires. If the wires look to be closer in size to telephone wire - or low voltage thermostat wire, it is most likely the 24 volt (or less) type. Low voltage door bell circuits usually originate at a small 120 volt to 24 volt (may be any value between 12 and 24 volts) transformer connected to the side of electrical panel. The presence of a transformer is also a good indication, too. In any case, treating the wiring as if it was line voltage (120 volts) will help prevent getting hurt.
4
Listen carefully and then observe the moving parts while an assistant presses the door bell button several times. A faint buzzing sound or slight movement confirms that the chime unit is getting powered.
5
Check and tighten the electrical points (fuses and circuit breakers, terminal screws of the door bell button(s), and transformer) if unable to hear or see the indications above and try again. If still unable to hear or see the indications above, just continue following the steps below.
6
Check the plunger for freedom of movement. Gently push / pull the plunger(s). It may move only in one direction, but may move in both. If unable to move the plunger, or it moves but does not "spring back" into position, it is likely hanging up on dirt, dust, etc.
7
Clean the moving parts of the chime unit. Do not use any kind of lubricant. No oil, no WD-40, no graphite powder, and no silicon spray. These may work for a short time, but will quickly attract dust and grime and gum up the plungers.
8
Cleaning can be done in place or removed from the wall. Either way will require safeguarding the area from dirt, solvents, etc. If removing from wall, label the wires and terminals before disconnecting.
9
Spray a short blast of electrical contact cleaner at the moving parts. Do not be surprised to see dirty contact cleaner dripping out of the mechanism. Attempt to move the plunger again. Continue to spray bursts while moving the plunger. The idea is to flush out any dirt, etc that has collected around the metal plunger body.
10
Once the plunger is able to move freely, the chime unit is ready to be reconnected and tested by pressing the door bell button.
11
Compare the voltage rating of the chime (likely 12 to 24 volts) with the rated voltage output stamped on the transformer. These values must match. Replace either the chime or transformer so that the two have matching voltage values. Most doorbell transformers are marked with AC voltage, but also have a 25 VA (watts) rating -- do not confuse VA with AC volts.
12
Remove wires from door bell buttons and touch wires together. If chime works, replace door bell buttons.

Tuesday, March 15, 2011

How to Repair a Range Hood


HOW TO REPAIR A RANGE HOOD

A range hood that doesn't adequately remove smoke and smells from your kitchen is usually suffering from one of a few common problems: The grease filter or some part of the exhaust ductwork may be clogged, or the fan may be bad. Neither of these repairs should take you much time.
Instructions

Unclogging the exhaust system
1
Remove the grease filter by sliding it out of its clips.
2
Submerge the filter in a plastic pan filled with hot, soapy water and 1/2 cup (4 fl oz/125 ml) ammonia. Let it soak for at least 15 minutes. If it's still dirty, soak it again, then rinse it thoroughly and set it aside to dry.
3
Remove the exhaust fan. Unplug the fan, then use a screwdriver or a nut driver and socket to take out the screws that attach it to the hood.
4
Clean the fan blades with an old toothbrush dipped into the ammonia-water mixture (see Warning).
5
Clean the inside of the exhaust ductwork, using a plumber's snake with a heavy rag tied around the end. Push the snake through the ductwork. Soak the rag in the ammonia and water mixture, then run it through the ductwork. Rinse out the rag and repeat the operation until the duct appears to be clean.
6
Clean the exhaust hood that's attached to the outside of your house. Use the old toothbrush and the ammonia-water mixture to loosen the grit and grime around the flapper plate. Make sure the plate moves freely when you're done. If it sticks closed, it can prevent the exhaust hood from working.
7
Reinstall the grease filter.

Friday, March 11, 2011

Repairing your Bathroom Fan. Easier than you think!

How to Repair a Bathroom Fan
Fix your bath fan without replacing the entire unit and improve air flow with a first class vent system. You can replace a dead motor without tearing out the ceiling and replacing the whole thing. You can also improve venting and prevent roof rot by running the vent through the roof, and not leave it in the attic as was done by many contractors.
Both improvements are easy. This article shows you how.
Replace a dead motor
If your bathroom fan is dead, here's some good news: You don't have to tear out the entire unit. Even if you fan is decades old, chances are you can get a replacement motor. Although a new motor costs about the same as a new fan, replacement saves time and trouble. You don't have to cut into the ceiling, crawl around your attic or get up on your roof. It usually takes less than an hour.
Your first step is to get the fan's model number. Remove the fan grille (Photo 1) and vacuum away the dust to find the number on a label or stamped on the fan’s housing. But don't order a new motor until you remove the old one. You might need other parts too.
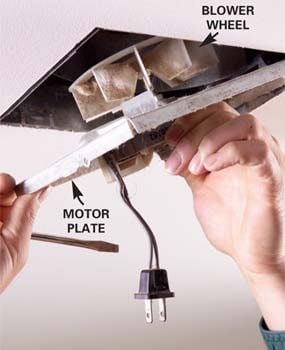
Bath fans vary in design, but motor replacement requires the same basic steps, no matter which brand or model you have. Turn off the power to the fan at the main breaker panel. Then unplug the fan and remove the motor plate (Photo 2). Some motor plates release by pressing or prying on the side of the fan housing. Others are secured with a screw or two.
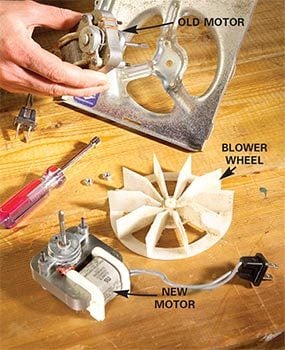
Before you can remove the motor from the plate, you have to get the blower off the motor's shaft. This is often the toughest part of the whole project. An older metal blower might be fastened with a screw. Plastic blowers usually aren't fastened at all, but simply slide off the shaft. Either way, removal may require some hard prying and pulling. If you wreck the blower while removing it, don't worry. You can order a replacement at little cost. To install the new motor, simply reverse the removal process.

Run duct outside to prevent roof rot

When there's an attic above the bathroom, some installers take a shortcut: Instead of running the duct through the roof, they end the duct inside the attic. The result is that the fan fills the attic with moist air. That moisture feeds wood rot. In winter, frost forms in the attic and as the frost melts, water can damage the ceilings below.
If you don't have a cap on your roof like the one shown in Photo 2, chances are your bath fan vents into the attic. Running a new duct up through the roof isn't a complex job, but you will have to work in the attic and on the roof. Since you're doing all that work anyway, consider replacing the fan.
An attic can get dangerously hot in summer, so work on a cool day. Wear a dust mask and eye protection. Bring a trouble light and a large scrap of plywood to use as a work platform. Here's how to do the job with only two trips to the attic: On your first trip, measure the exhaust port diameter and pick a spot near the fan where you want the duct to exit the roof. Drive a screw up through the roof so you can find the location from outside. Then head over to http://www.storeforparts.com/ 

Here is what you need.

A roof vent cap.
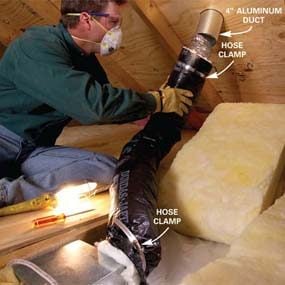
  • Aluminum duct the same size as the flexible duct. You only need about 6 in., so buy the shortest section available and cut it with a metal snips.
  • Two 6-in. hose clamps.
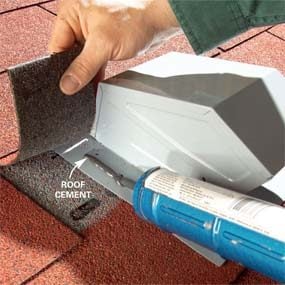
  • One tube of roofing cement.
  • Roofing nails and 1/2-in. sheet metal screws.
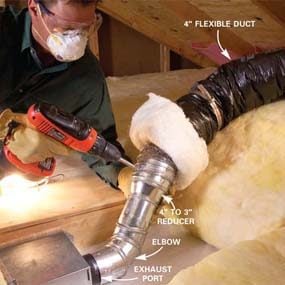
  • Flexible, insulated duct. Insulation prevents condensation from forming on or inside the duct. Home centers often carry only 4-in. insulated duct. If your fan has a 3-in. port, you can still use 4-in. duct by attaching a 3-in. elbow and a 3 x 4-in. reducer with sheet metal screws as shown in Photo 5.
Install the roof vent cap as shown in Photos 1 – 4. Photos 5 and 6 show how to finish the job in the attic.