Showing posts with label Nutone Parts. Show all posts

Sunday, June 26, 2011

5 Keys to a Successful Home Renovation

hard hat 300x199 5 Keys to a Successful Home Renovation
Home renovation can be a stressful undertaking. It is wise to deliberate carefully about renovations. All disputes over the renovation plan must be settled before the work begins or you are just postponing an inevitable (and probably heated) argument. Everyone in the family should have a voice in this undertaking, as it truly is a family affair.
The following list could have had three, eight or even 20 entries, but if you stick with the basics and exercise self-control, the following five keys can help guide you to, and through, a successful home renovation.
1. Good relationships mean good business – A home renovation will be a lot less stressful if you have a solid, trusting relationship with your contractor. Trust doesn’t arise between people instantly, but there are ways to speed the process, such as “third-party trust,” meaning referrals. If you don’t already know and respect a builder in your area, ask the people you trust about the contractors that they trust. Get referrals, and interview the prospects to get at least somewhat of a “feel” for them. Get referrals, check credentials, trust your instincts – and call references. Nothing builds trust in a contractor like good, positive reports from previous customers.
2. Accurate budgets are crucial – You need to understand how to budget for the job, and what is really involved, financially, in your home renovation. The better understanding you have of your budget, and the more accurate the estimates you include, the less likely your job will exceed your expectations. Although your contractor can supply some good information here, you should maintain authority over the budget yourself and not give anyone – not your spouse, your family as a whole or the contractor – the “keys to your wallet.” Do your homework, and follow the budget.
3. Home renovation is messy – Prior to the start of actual construction, remove all valuables and breakables from the affected areas. Unless the garage is part of the plan, you might consider storing items there. If the whole house is involved, think about renting a storage unit. While this will cause some short-term dislocation and require some sweat from the family’s brows (or more paid help), renovations are inevitably messy and accidents will happen. Take whatever steps are necessary to ensure the safety of your valuables, fine furniture, Persian rugs and other possessions.
4. Stick to the payment plan – One easy way to ruin your relationship with your contractor, and slow down or terminate your renovation project, is to deviate from your payment plan. If you are developing a timetable for the contractor’s work, you should also prepare, and adhere to, a timetable for the payments. You should be proactive in this matter, and never allow communication to deteriorate to the point where the contractor has to ask for money. Plan out every detail and every dollar, and follow the plan.
5. Extras: There’s always something – When developing your renovation budget, leave some room for the unanticipated extras that inevitably come up in the course of a home renovation. In addition, once you start renovating, you may think of other improvements or changes you wish to make. This means building some flexibility into the financing, as well as the project plan and the timetable. Strike a balance between firmness and flexibility so that you don’t go off on a tangent and lose control of the cost or the schedule.
Like most big undertakings, a home renovation can be somewhat scary. Don’t hesitate to speak with friends, relatives, coworkers or neighbors who have been through the same thing. Investigate all concerns – listen carefully, take notes and don’t leave any question unanswered before finalizing your plan and your budget. Don’t be in a hurry, don’t make assumptions and, above all, do not waver in your determination to see the project through to a successful conclusion

Tuesday, June 21, 2011

OSHA Announces Three Month Phase-In for Residential Construction Fall Protection

The U.S. Department of Labor's Occupational Safety and Health Administration (OSHA) today announced a three month phase-in period to allow residential construction employers to come into compliance with the agency's new directive to provide residential construction workers with fall protection.

The three month phase-in period runs June 16 - September 15, 2011. During this time, if the employer is in full compliance with the old directive (STD 03-00-001), OSHA will not issue citations, but will instead issue a hazard alert letter informing the employer of the feasible methods they can use to comply with OSHA's fall protection standard or implement a written fall protection plan. If the employer's practices do not meet the requirements set in the old directive, OSHA will issue appropriate citations.

If an employer fails to implement the fall protection measures outlined in a hazard alert letter, and during a subsequent inspection of one of the employer's workplaces OSHA finds violations involving the same hazards, the Area Office shall issue appropriate citations.

The new directive, Compliance Guidance for Residential Construction (STD 03-11-002), a detailed description of the phase-in policy, a presentation and other guidance materials about requirements for protecting workers from falls are available at http://www.osha.gov/doc/residential_fall_protection.html.

A Safety and Health Topics Web page, which provides a list of references to help employers identify fall hazards and possible solutions for eliminating such hazards, is available at http://www.osha.gov/SLTC/fallprotection/construction.html


OSHA's On-Site Consultation Program offers free and confidential advice to small and medium-sized businesses in all states across the country, with priority given to high-hazard worksites. For more information, visit http://www.osha.gov/dcsp/smallbusiness/consult.html.

Under the Occupational Safety and Health Act of 1970, employers are responsible for providing safe and healthful workplaces for their employees. OSHA's role is to assure these conditions for America's working men and women by setting and enforcing standards, and providing training, education and assistance. For more information, visit http://www.osha.gov/.

Thursday, June 16, 2011

Using this sales goal template, College City Design-Build’s salespeople build their own year by projecting reachable targets and charting progress. The individual sales plan takes into consideration the salesperson’s capacity, ambition, and desire for income, so the template drives results, says Bjorn Freudenthal, the Lakeville, Minn., company’s vice president of marketing and sales.
Each salesperson is given the same template with a different number of bids, leads, and project types. The template is divided up by month, quarter, and by number of projects and type of project.
Although goals are set at the beginning of every year, Freudenthal meets with each salesperson every two weeks to review leads, bids, and jobs sold and to review sales goals and year-to-date results.
Freudenthal, who developed the template with a local supplier, Charlie Bradburn, the sales manager at Automated Building Components’ millworks division, says it allows salespeople to be more strategic about their performance, which “leads to company buy-in ... . We have people who [see] themselves as owners and manage this form as an owner would ... a P&L.”

Small Bites
The budgeted sales for this individual are $1.3 million. For the first quarter, $325,000 is his sales goal. As of January he had reached $215,000, but he still had February and March to hit the $325,000 mark. He was just 33.8% behind his quarterly goal.
Sales Strategy
Some salespeople lean toward certain types of projects and have an easier time selling those. “But if you say that you want to sell more kitchens,” Freudenthal asks his sales team, “What actions are you taking to do so? Taking workshops, going after prospects, striking up relationships with showroom reps?” This is a way for salespeople to look at their own sales more strategically.
Goal-Oriented
Freudenthal and each sales rep review the document to see if the salesperson is on track and if activity goals and volumes are on target. “If we’re not,” Freudenthal says, “we ask why and [look at] what obstacles are in the way and how can we get to the desired results.”
Make Your Margins
This is your company’s average closed margin, which you put in. After the contract is executed and the project is built, that closing margin is tracked, and that’s the number on the sales template for a particular salesperson. The goal is to have the closing margin be the same as (or better than) the pre-construction margin.
Which Path?
“D/B” is for those design/ build jobs that follow College City Design-Build’s 12-step system. (Small jobs have a lead designer and don’t follow the D/B process.) These numbers are used for tracking.
Suggested Follow-Up
These cover goals and objectives and how best to attain them.

Sunday, May 29, 2011

Major Overhaul: Address Weaknesses in Your Business

Mike Majors was stuck. Back in 2004, Majors Home Improvement, in Milton, Fla., had produced an annual revenue of around $1.2 million each year for several years, but Majors wanted to grow the business. Since he wore all the hats — sales, marketing, scheduling, production, human resources — as well as lead the company, he couldn’t dedicate the time to make the sales happen. Then, a series of hurricanes forced him to make dramatic decisions.
“Because of the hurricane damage, leads were starting to come in fast, but I couldn’t handle them because I was handling everything,” he says. “I had to make a change.”

Know Your Limitations

Majors decided to add staff. First he identified his own weaknesses: marketing and selling. “I could close sales but that was ... because my name was on the company,” he says. “If I was serious about growth, I needed good salespeople.” He was determined that once he hired good people he would maintain the revenue needed to keep them.
“I never ran help-wanted ads because I don’t want people who are looking for work; I want people who are successful in their current position,” Majors says. He spread the word, and a mutual acquaintance introduced him to Jonathan Wells, then working in a local advertising agency. With an MBA and years of experience in direct-response marketing, Wells turned out to be a great fit.
Next, Majors focused on sales. Again, mutual friends told him about Chuck Mepham, another MBA who had proven his sales success in years with Sears. Today he is Majors Home Improvement’s sales manager.

Let Go

In 2005, the company grew to $3.2 million and both new team members earned significant compensation. Now that the hurricanes are a thing of the past, volume has dropped but is significantly higher than before Wells and Mepham joined the team.
It wasn’t easy for Majors to hand over control of two major areas of the business. “It was difficult to give the responsibility,” he says, “but I think that the fact we were so busy and I had so much to focus on forced me to let go.”
Majors still keeps his finger on the pulse of the company with daily lead, sales, and production reports, and his key managers have earned his confidence. “Now, while they may run some things past me, I trust their judgment and know that they are better at their jobs than I ever was. This confidence lets me focus on other important aspects of the business.”

New Law Will Save Big Bucks for Small Businesses

A bill was sent to President Obama’s desk yesterday that repeals a small part of his own healthcare legislation. However, if it becomes law, it will make life a little easier for remodelers, contractors, and any other small business that uses its fair share of vendors.
By a vote of 87 to 12, the Senate approved the Small Business Paperwork Mandate Elimination Act of 2011 on April 5. The law repeals a burdensome tax paperwork requirement that was part of the Patient Protection and Affordable Care Act approved last year. This would have mandated that starting next year businesses would be required to file a 1099 for every vendor that provided more than $600 in services or goods throughout the course of a year.
The annual $600 limit was for all vendors so contractors would find themselves sending out a stack of 1099s not just for their subs and vendors but also for mundane purchases such as coffee, office supplies, and even fuel.
No doubt the requirement — had it become a law — would have meant that businesses would have to spend resources on accountants and bookkeepers to adhere to the rule rather than on expanding their operation in a more meaningful way.
Aside from eliminating the 1099 requirements, the new potential law also repeals a component in the Small Business Jobs Act of 2010 that stipulated that as of Jan. 1, 2011, landlords had to submit 1099s to vendors that supplied them with more than $600 of services.
Contractors, remodelers, and other small businesses can continue sending out 1099s as they have been in the past based on the IRS’s reporting procedures.
www.StoreForParts.com

Monday, May 2, 2011

Remodeling Market Index Reaches Highest Level in Four Years

According to the National Association of Home Builders' (NAHB) Remodeling Market Index (RMI), the remodeling market is heading into recovery with an increase to 46.5 in the first quarter of 2011 from 41.5 in the fourth quarter of 2010. This marks the highest level for the RMI since the fourth quarter of 2006. An RMI below 50, however, indicates that still more remodelers report market activity is lower (compared to the prior quarter) than report it is higher.

The overall RMI combines ratings of current remodeling activity with indicators of future activity like calls for bids. Current market conditions for the first quarter of 2011 rose to 46.1 from 43.3 in the previous quarter. Future market indicators climbed to 46.8 from 39.7 in the previous quarter.
"Remodelers report a jump in activity so far this year and have been receiving more calls for work and appointments," said NAHB Remodelers Chairman Bob Peterson, CGR, CAPS, CGP, a remodeler from Ft. Collins, Colo. "However, many home owners are still slow to commit to remodeling due to feeling uncertain about the economic recovery and difficulty obtaining loans."
Regional break downs for current remodeling market conditions showed growth in all but one area: Northeast 46.1 (from 38.8 in the fourth quarter), South 46.1 (from 45.8), and West 46.1 (from 39.7). Only the Midwest experienced a decline to 47.1 (from 54.3).

All current remodeling market indicators increased: major additions to 50.3 (from 48.6 in the fourth quarter), minor additions to 48.0 (from 43.9), and maintenance and repair to 39.5 (from 37.0). Future market indicators also improved across the board: calls for bids rose to 53.1 (from 47.2), appointments for proposals to 52.4 (from 43.1), backlog of remodeling jobs to 49.7 (from 42.6), and amount of work committed for the next three months to 32.1 (from 25.9).
In an additional special question remodelers reported the top reasons prospective customers are holding back from remodeling their homes:
Customers think it is hard to get financing (90 percent of remodeler respondents)Customers have lost equity in their homes (81 percent)Customers are uncertain about their future economic situation (74 percent)Reluctance to invest in home when not sure home will hold its value (67 percent)Negative media stories making customers more cautious (62 percent)Inaccurate appraisals are making financing more difficult (54 percent)
"Home remodeling continues to slowly increase and continued growth through the year is expected." said NAHB Chief Economist David Crowe. "The fact that some indicators are breaking 50 means remodelers are seeing improving activity in their markets. While credit scarcity and economic uncertainty continue to weigh down remodeling, signs of increasing consumer interest are promising."

Thursday, April 14, 2011

Upgrade Kits

Broan Bath Fan Upgrade Kit

Broan Bath Fan Upgrade Kit
 
Do you have an old, ugly, noisy, worn-out Broan or Nutone bath fan?  Now it's easy to replace the old bath fan with Broan's Model #690 Bath Fan Upgrade Kit.  The upgrade kit will move more air and is quieter than the old model too.
Features
  • No re-wiring
  • No new duct work
  • No hassels
  • New motor (60 CFM and 3.0 Sones) reduces sound up to 50%, improves air movement up to 20%, and helps control humidity that causes mold and mildew
  • New grille - Upgrade your bathroom's look with a modern white grille (can be painted)
  • No special tools are required - kit includes everything you need
  • Two motor plates included to fit most economy fans

Broan 690 Upgrade Kit replaces the models below:
If your grille looks like this:
 
The fan is very likely one of these models:
 
Housing Dimensions:
Broan
670, 671, 688, 689

Nautilus
N671, N688

7-1/2"x7-1/4" only
* 8" x 8-1/4" are not compatible

NuTone
693, 695, 696N
7-1/2"x7-1/4"
or
8"x7-1/4"

Broan 690 Upgrade Kit replaces the models below:
If your grille looks like this:
 
The fan is very likely one of these models:
 
Housing Dimensions:
Broan
670, 671, 688, 689

Nautilus
N671, N688

7-1/2"x7-1/4" only
* 8" x 8-1/4" are not compatible

NuTone
693, 695, 696N
7-1/2"x7-1/4"
or
8"x7-1/4"
More Information:

  • Model: 690
  • Manufactured by: Broan

Friday, March 25, 2011

How to Clean a Range Hood


How to Clean a Range Hood Filter


Avoid household fire hazards, and keep your range hood and fan doing what they are supposed to do! Cleaning your range hood is an important part of kitchen cleanup!

Instructions


things you'll need:


  • tri-sodium phosphate
  • Stiff wire brush
  • rubber gloves
  • soaking bucket
  • cleaning rags

  1. Remove the fan filter from the range hood fan. You can also remove any light covers, knobs, etc. that need to be cleaned.
  2. Fill a bucket or some other container with enough hot or boiling water to cover the filter (and/or other parts), when placed inside.
  3. Put on your rubber gloves and add the recommended amount of tri-sodium phosphate to the water. Mix and place the fan filter in the bucket with the mixture. Let soak for about 1 hour.
  4. After soaking, remove the dirt and grease from the filter by scrubbing with a stiff wire or other type of sturdy brush.
  5. Prepare additional cleaning solution with the tri-sodium phosphate and water. Use your cleaning rags and the brush to wash the range hood thoroughly. The tri-sodium phosphate will cut the grease and make cleaning a breeze
  6. Rinse and dry all cleaned surfaces, and replace the range fan filters and parts.

Tuesday, March 15, 2011

How to Repair a Range Hood


HOW TO REPAIR A RANGE HOOD

A range hood that doesn't adequately remove smoke and smells from your kitchen is usually suffering from one of a few common problems: The grease filter or some part of the exhaust ductwork may be clogged, or the fan may be bad. Neither of these repairs should take you much time.
Instructions

Unclogging the exhaust system
1
Remove the grease filter by sliding it out of its clips.
2
Submerge the filter in a plastic pan filled with hot, soapy water and 1/2 cup (4 fl oz/125 ml) ammonia. Let it soak for at least 15 minutes. If it's still dirty, soak it again, then rinse it thoroughly and set it aside to dry.
3
Remove the exhaust fan. Unplug the fan, then use a screwdriver or a nut driver and socket to take out the screws that attach it to the hood.
4
Clean the fan blades with an old toothbrush dipped into the ammonia-water mixture (see Warning).
5
Clean the inside of the exhaust ductwork, using a plumber's snake with a heavy rag tied around the end. Push the snake through the ductwork. Soak the rag in the ammonia and water mixture, then run it through the ductwork. Rinse out the rag and repeat the operation until the duct appears to be clean.
6
Clean the exhaust hood that's attached to the outside of your house. Use the old toothbrush and the ammonia-water mixture to loosen the grit and grime around the flapper plate. Make sure the plate moves freely when you're done. If it sticks closed, it can prevent the exhaust hood from working.
7
Reinstall the grease filter.

Friday, March 11, 2011

Repairing your Bathroom Fan. Easier than you think!

How to Repair a Bathroom Fan
Fix your bath fan without replacing the entire unit and improve air flow with a first class vent system. You can replace a dead motor without tearing out the ceiling and replacing the whole thing. You can also improve venting and prevent roof rot by running the vent through the roof, and not leave it in the attic as was done by many contractors.
Both improvements are easy. This article shows you how.
Replace a dead motor
If your bathroom fan is dead, here's some good news: You don't have to tear out the entire unit. Even if you fan is decades old, chances are you can get a replacement motor. Although a new motor costs about the same as a new fan, replacement saves time and trouble. You don't have to cut into the ceiling, crawl around your attic or get up on your roof. It usually takes less than an hour.
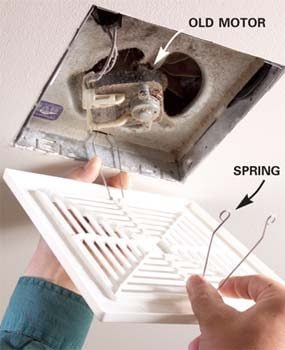
Your first step is to get the fan's model number. Remove the fan grille (Photo 1) and vacuum away the dust to find the number on a label or stamped on the fan’s housing. But don't order a new motor until you remove the old one. You might need other parts too.
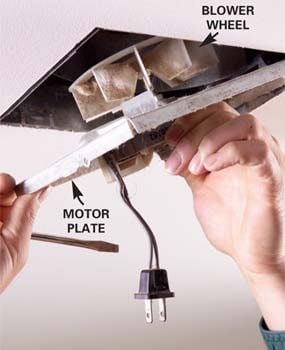
Bath fans vary in design, but motor replacement requires the same basic steps, no matter which brand or model you have. Turn off the power to the fan at the main breaker panel. Then unplug the fan and remove the motor plate (Photo 2). Some motor plates release by pressing or prying on the side of the fan housing. Others are secured with a screw or two.
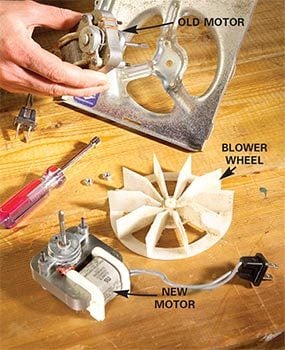
Before you can remove the motor from the plate, you have to get the blower off the motor's shaft. This is often the toughest part of the whole project. An older metal blower might be fastened with a screw. Plastic blowers usually aren't fastened at all, but simply slide off the shaft. Either way, removal may require some hard prying and pulling. If you wreck the blower while removing it, don't worry. You can order a replacement at little cost. To install the new motor, simply reverse the removal process.

Run duct outside to prevent roof rot

When there's an attic above the bathroom, some installers take a shortcut: Instead of running the duct through the roof, they end the duct inside the attic. The result is that the fan fills the attic with moist air. That moisture feeds wood rot. In winter, frost forms in the attic and as the frost melts, water can damage the ceilings below.
If you don't have a cap on your roof like the one shown in Photo 2, chances are your bath fan vents into the attic. Running a new duct up through the roof isn't a complex job, but you will have to work in the attic and on the roof. Since you're doing all that work anyway, consider replacing the fan.
An attic can get dangerously hot in summer, so work on a cool day. Wear a dust mask and eye protection. Bring a trouble light and a large scrap of plywood to use as a work platform. Here's how to do the job with only two trips to the attic: On your first trip, measure the exhaust port diameter and pick a spot near the fan where you want the duct to exit the roof. Drive a screw up through the roof so you can find the location from outside. Then head over to http://www.storeforparts.com/ 

Here is what you need.

A roof vent cap.
  • Aluminum duct the same size as the flexible duct. You only need about 6 in., so buy the shortest section available and cut it with a metal snips.
  • Two 6-in. hose clamps.
  • One tube of roofing cement.
  • Roofing nails and 1/2-in. sheet metal screws.
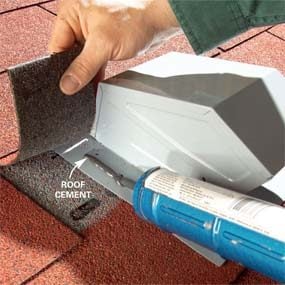
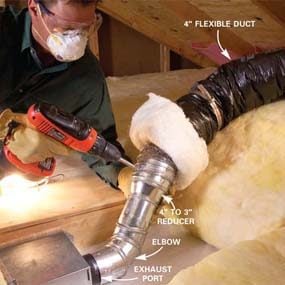
  • Flexible, insulated duct. Insulation prevents condensation from forming on or inside the duct. Home centers often carry only 4-in. insulated duct. If your fan has a 3-in. port, you can still use 4-in. duct by attaching a 3-in. elbow and a 3 x 4-in. reducer with sheet metal screws as shown in Photo 5.
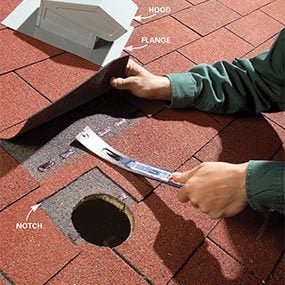
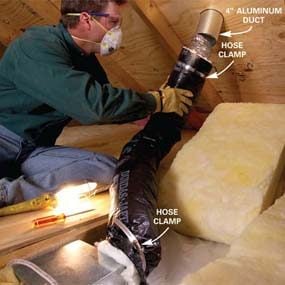
Install the roof vent cap as shown in Photos 1 – 4. Photos 5 and 6 show how to finish the job in the attic.