Showing posts with label Bathroom fan parts. Show all posts

Tuesday, June 21, 2011

OSHA Announces Three Month Phase-In for Residential Construction Fall Protection

The U.S. Department of Labor's Occupational Safety and Health Administration (OSHA) today announced a three month phase-in period to allow residential construction employers to come into compliance with the agency's new directive to provide residential construction workers with fall protection.

The three month phase-in period runs June 16 - September 15, 2011. During this time, if the employer is in full compliance with the old directive (STD 03-00-001), OSHA will not issue citations, but will instead issue a hazard alert letter informing the employer of the feasible methods they can use to comply with OSHA's fall protection standard or implement a written fall protection plan. If the employer's practices do not meet the requirements set in the old directive, OSHA will issue appropriate citations.

If an employer fails to implement the fall protection measures outlined in a hazard alert letter, and during a subsequent inspection of one of the employer's workplaces OSHA finds violations involving the same hazards, the Area Office shall issue appropriate citations.

The new directive, Compliance Guidance for Residential Construction (STD 03-11-002), a detailed description of the phase-in policy, a presentation and other guidance materials about requirements for protecting workers from falls are available at http://www.osha.gov/doc/residential_fall_protection.html.

A Safety and Health Topics Web page, which provides a list of references to help employers identify fall hazards and possible solutions for eliminating such hazards, is available at http://www.osha.gov/SLTC/fallprotection/construction.html


OSHA's On-Site Consultation Program offers free and confidential advice to small and medium-sized businesses in all states across the country, with priority given to high-hazard worksites. For more information, visit http://www.osha.gov/dcsp/smallbusiness/consult.html.

Under the Occupational Safety and Health Act of 1970, employers are responsible for providing safe and healthful workplaces for their employees. OSHA's role is to assure these conditions for America's working men and women by setting and enforcing standards, and providing training, education and assistance. For more information, visit http://www.osha.gov/.

Tuesday, April 5, 2011

Fixing That Old Attic Fan

Whole house or attic fans are a wonderful thing to have and often replace air conditioning units for people in climates where the evenings are cool in the summer. When the attic fan is working properly, it provides an air exchange for the entire house and encourages breezes to flow freely through the rooms. If the fan has stopped working, you may think you have to call in a repairman, but the job may be simple enough to do yourself.

things you'll need:
Screwdriver
Voltage sensor
Extension cord
Electric light
Parts as needed

1
Identify the problem. This may sound simple enough, but the way you proceed depends heavily on the source of the problem. Many fans have either motor malfunctions or troubles with a thermostat.
2
Diagnose electrical problems with an extension cord. If your fan plugs into a standard outlet, simply bring an extension cord and a small lamp up to the attic with you. Keep the extension cord plugged into another outlet, plug the fan into it and see what happens. If the fan works, then you've probably got an electrical problem. Try plugging the lamp into the outlet dedicated to the fan; if it doesn't work, you've identified the problem.
3
Check the thermostat. Many attic fans stop working because of a problem with the thermostat. If your fan has an "off/on" switch that can bypass the thermostat, try that and see if the fan turns on. If it does, you've found the problem. If it doesn't have that option, remove the thermostat to see if the fan still functions. Be sure to disconnect any electricity at this point.
4
Get the right parts for the job. If you've diagnosed a motor or thermostat problem, you should be able to get the parts at StoreForParts.com.
5
Replace the parts. Once you've got the parts, you can easily follow the manufacturer's instructions for replacing the problem part.

Remember that your fan is an electrical appliance. Use every precaution when dealing with electrical items and turn off the electricity from the circuit breaker whenever you are working on them. Check your paperwork for a warranty before you begin your repair. Your fan's problem may be covered and you may get a free replacement part, service or even a new fan if yours is still covered. Check your prices; sometimes it's cheaper and easier to replace the fan than it is to repair it.

While doing it yourself is very satisfying, you don't want to pay more for the parts than you would to get a brand new fan.If your problem is within the electrical system of your house and you don't have experience with wiring, seek professional help. Electrical work can be tricky and dangerous and if you feel you are in over your head, you probably are

Tuesday, March 29, 2011

If your trash compactor's motor is working but the machine won't flatten your trash, you could have a broken or stretched drive chain or drive belt. Tightening the belt or replacing it is a snap.

Instructions


WHAT YOU'LL NEED


  • Replacement Drive Belt Or Drive Chain
  • Nut Driver And Socket
  • Screwdriver
  • Socket Wrench And Socket
  1. Unscrew the compactor from your kitchen counter, using a screwdriver. 
  2. Lay the unit on its side and locate the drive chain or belt. It will be under a cover plate on the top or bottom of the machine.
  3. Remove the cover plate, using a nut driver and socket. You'll see the drive gear, one or more power screw sprockets, and a drive chain or drive belt.
  4. Inspect the chain or belt. If it appears slack, you just need to increase the tension as explained in step 
  5.  If it's broken, buy a replacement at an appliance store, then go on to step 6

    Loosen the motor mount bolts, using a socket wrench and socket (see A). Then push the mount toward the power screw sprocket(s). This will make it easier to fit the new chain or belt in place.


  6. Slip the chain or belt over the sprockets (see B). On trash compactors with two power screws, you may have to unbolt the power screws from the frame and slide them out of the unit a bit to install the chain or belt.
  7. Push the motor mount away from the power screw sprocket(s) to increase the tension on the drive chain or belt. Tighten the motor mount bolts and check the tension. You should have no more than 1/2 inch (12 mm) of flex. Loosen the bolts and increase the tension again if necessary.
  8. Reinstall the cover plate, and screw the compactor to the counter.

Thursday, March 24, 2011

How To Replace a Bathroom Grille


In this video clip we will be replacing a bath fan grill. In this bathroom we have a ventilation fan located on the ceiling. Now there's an old 1980's yellow colored grill covering this fan. In addition to it being old and yellow there is a lot of dust and other types of debris that have collected in it over the years. We're going to be replacing this with a new clean grill. Our first step is to pull the grill straight down. It's attached by springs and you'll pull down and you'll be able to pivot it. Next we will need to disconnect our spring. There's a spring on both sides so make sure you take both of those off. After that we need to vacuum out our fan unit. After that we can put our new grill in place and push it straight up. That one looks much better than the old one and it should function a lot better because we did vacuum that out as well.


Friday, March 11, 2011

Repairing your Bathroom Fan. Easier than you think!

How to Repair a Bathroom Fan
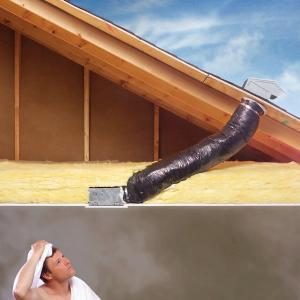
Fix your bath fan without replacing the entire unit and improve air flow with a first class vent system. You can replace a dead motor without tearing out the ceiling and replacing the whole thing. You can also improve venting and prevent roof rot by running the vent through the roof, and not leave it in the attic as was done by many contractors.
Both improvements are easy. This article shows you how.
Replace a dead motor
If your bathroom fan is dead, here's some good news: You don't have to tear out the entire unit. Even if you fan is decades old, chances are you can get a replacement motor. Although a new motor costs about the same as a new fan, replacement saves time and trouble. You don't have to cut into the ceiling, crawl around your attic or get up on your roof. It usually takes less than an hour.
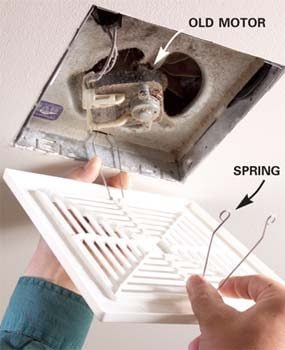
Your first step is to get the fan's model number. Remove the fan grille (Photo 1) and vacuum away the dust to find the number on a label or stamped on the fan’s housing. But don't order a new motor until you remove the old one. You might need other parts too.
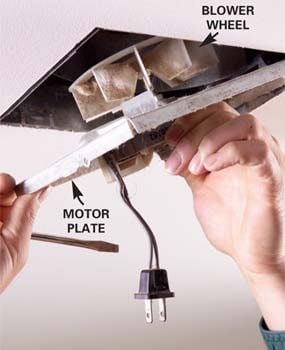
Bath fans vary in design, but motor replacement requires the same basic steps, no matter which brand or model you have. Turn off the power to the fan at the main breaker panel. Then unplug the fan and remove the motor plate (Photo 2). Some motor plates release by pressing or prying on the side of the fan housing. Others are secured with a screw or two.
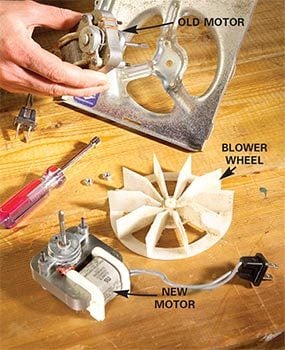
Before you can remove the motor from the plate, you have to get the blower off the motor's shaft. This is often the toughest part of the whole project. An older metal blower might be fastened with a screw. Plastic blowers usually aren't fastened at all, but simply slide off the shaft. Either way, removal may require some hard prying and pulling. If you wreck the blower while removing it, don't worry. You can order a replacement at little cost. To install the new motor, simply reverse the removal process.

Run duct outside to prevent roof rot

When there's an attic above the bathroom, some installers take a shortcut: Instead of running the duct through the roof, they end the duct inside the attic. The result is that the fan fills the attic with moist air. That moisture feeds wood rot. In winter, frost forms in the attic and as the frost melts, water can damage the ceilings below.
If you don't have a cap on your roof like the one shown in Photo 2, chances are your bath fan vents into the attic. Running a new duct up through the roof isn't a complex job, but you will have to work in the attic and on the roof. Since you're doing all that work anyway, consider replacing the fan.
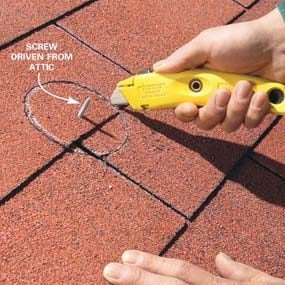
An attic can get dangerously hot in summer, so work on a cool day. Wear a dust mask and eye protection. Bring a trouble light and a large scrap of plywood to use as a work platform. Here's how to do the job with only two trips to the attic: On your first trip, measure the exhaust port diameter and pick a spot near the fan where you want the duct to exit the roof. Drive a screw up through the roof so you can find the location from outside. Then head over to http://www.storeforparts.com/ 

Here is what you need.

A roof vent cap.
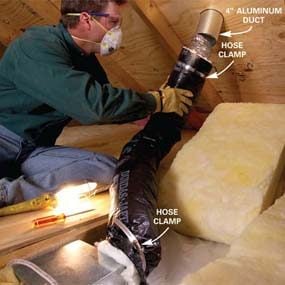
  • Aluminum duct the same size as the flexible duct. You only need about 6 in., so buy the shortest section available and cut it with a metal snips.
  • Two 6-in. hose clamps.
  • One tube of roofing cement.
  • Roofing nails and 1/2-in. sheet metal screws.
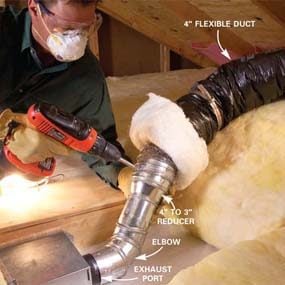
  • Flexible, insulated duct. Insulation prevents condensation from forming on or inside the duct. Home centers often carry only 4-in. insulated duct. If your fan has a 3-in. port, you can still use 4-in. duct by attaching a 3-in. elbow and a 3 x 4-in. reducer with sheet metal screws as shown in Photo 5.
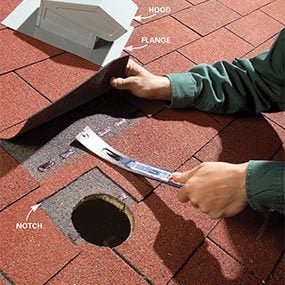
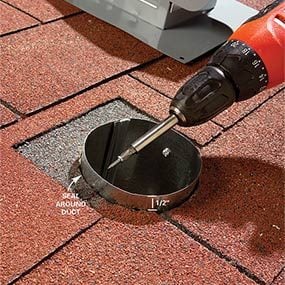
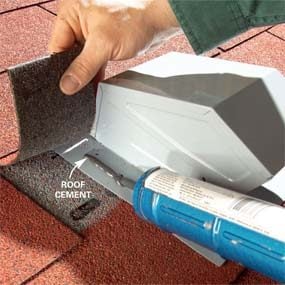
Install the roof vent cap as shown in Photos 1 – 4. Photos 5 and 6 show how to finish the job in the attic.