Showing posts with label nutone fan parts. Show all posts

Sunday, May 29, 2011

New Law Will Save Big Bucks for Small Businesses

A bill was sent to President Obama’s desk yesterday that repeals a small part of his own healthcare legislation. However, if it becomes law, it will make life a little easier for remodelers, contractors, and any other small business that uses its fair share of vendors.
By a vote of 87 to 12, the Senate approved the Small Business Paperwork Mandate Elimination Act of 2011 on April 5. The law repeals a burdensome tax paperwork requirement that was part of the Patient Protection and Affordable Care Act approved last year. This would have mandated that starting next year businesses would be required to file a 1099 for every vendor that provided more than $600 in services or goods throughout the course of a year.
The annual $600 limit was for all vendors so contractors would find themselves sending out a stack of 1099s not just for their subs and vendors but also for mundane purchases such as coffee, office supplies, and even fuel.
No doubt the requirement — had it become a law — would have meant that businesses would have to spend resources on accountants and bookkeepers to adhere to the rule rather than on expanding their operation in a more meaningful way.
Aside from eliminating the 1099 requirements, the new potential law also repeals a component in the Small Business Jobs Act of 2010 that stipulated that as of Jan. 1, 2011, landlords had to submit 1099s to vendors that supplied them with more than $600 of services.
Contractors, remodelers, and other small businesses can continue sending out 1099s as they have been in the past based on the IRS’s reporting procedures.
www.StoreForParts.com

Monday, May 2, 2011

Remodeling Market Index Reaches Highest Level in Four Years

According to the National Association of Home Builders' (NAHB) Remodeling Market Index (RMI), the remodeling market is heading into recovery with an increase to 46.5 in the first quarter of 2011 from 41.5 in the fourth quarter of 2010. This marks the highest level for the RMI since the fourth quarter of 2006. An RMI below 50, however, indicates that still more remodelers report market activity is lower (compared to the prior quarter) than report it is higher.

The overall RMI combines ratings of current remodeling activity with indicators of future activity like calls for bids. Current market conditions for the first quarter of 2011 rose to 46.1 from 43.3 in the previous quarter. Future market indicators climbed to 46.8 from 39.7 in the previous quarter.
"Remodelers report a jump in activity so far this year and have been receiving more calls for work and appointments," said NAHB Remodelers Chairman Bob Peterson, CGR, CAPS, CGP, a remodeler from Ft. Collins, Colo. "However, many home owners are still slow to commit to remodeling due to feeling uncertain about the economic recovery and difficulty obtaining loans."
Regional break downs for current remodeling market conditions showed growth in all but one area: Northeast 46.1 (from 38.8 in the fourth quarter), South 46.1 (from 45.8), and West 46.1 (from 39.7). Only the Midwest experienced a decline to 47.1 (from 54.3).

All current remodeling market indicators increased: major additions to 50.3 (from 48.6 in the fourth quarter), minor additions to 48.0 (from 43.9), and maintenance and repair to 39.5 (from 37.0). Future market indicators also improved across the board: calls for bids rose to 53.1 (from 47.2), appointments for proposals to 52.4 (from 43.1), backlog of remodeling jobs to 49.7 (from 42.6), and amount of work committed for the next three months to 32.1 (from 25.9).
In an additional special question remodelers reported the top reasons prospective customers are holding back from remodeling their homes:
Customers think it is hard to get financing (90 percent of remodeler respondents)Customers have lost equity in their homes (81 percent)Customers are uncertain about their future economic situation (74 percent)Reluctance to invest in home when not sure home will hold its value (67 percent)Negative media stories making customers more cautious (62 percent)Inaccurate appraisals are making financing more difficult (54 percent)
"Home remodeling continues to slowly increase and continued growth through the year is expected." said NAHB Chief Economist David Crowe. "The fact that some indicators are breaking 50 means remodelers are seeing improving activity in their markets. While credit scarcity and economic uncertainty continue to weigh down remodeling, signs of increasing consumer interest are promising."

Monday, April 18, 2011


What does CFM mean?
CFM is the acronym for Cubic Feet Per Minute - the measure of air volume moved by the fan blower. Choose a fan with a CFM rating appropriate for your room size to ensure adequate ventilation.
What is a Sone, and how is it measured?
A Sone is a measurement of sound in terms of comfortable hearing level for an average listener. The lower the sone value, the more comfortable the listening environment. Sones are not decibels or volume, but rather how sound is "sensed". One sone is the equivalent of a quiet refrigerator.
What is continuous ventilation?
Continuous ventilation provides today?s airtight homes with a relatively constant and controlled lower level of ventilation.
Can I mount fans above my tub and shower?
Most fans are rated for use over a shower or bathtub with a GFCI (Ground Fault Circuit Interrupter).

Can my ceiling fan be surrounded by insulation?
Yes. Bath fans are designed to provide adequate cooling for motors and lighting, as well as products with integral heaters.
Will fans work in wall-mount applications?
Some bath and utility fans may be wall mounted. See the spec matrix for specific models. Improper installation may affect fan life, safety and your warranty.
Will a ceiling fan or wall-mount utility fan serve as a range hood?
No. Range hoods are specifically designed to handle grease and high temperature environments. Ventilation provided by NuTone fans is only a supplement for odor and moisture removal in the kitchen.
What does "static pressure" mean?
Static pressure is the measurement of airflow resistance as it is pushed through ductwork which reduces the effectiveness of the fan. Learn more on the Home Ventilation Institute web site www.hvi.org.

How long should a bath fan run after a shower is used?
The Home Ventilation Institute recommends that a fan should be left on for 20 minutes more to clear humidity adequately and to ensure moisture and condensation in the fan body or ducting is minimized.
What should I do if I can't wait for moisture to clear, but I don't want a fan to run all day long.
Sensing fans that detect the humidity rise caused by a shower and turn on automatically, when moisture has cleared it turns off. Some wall controls also give you the option of humidity sensing, or timer control. Just set it and forget it.
What are the timer features?
Delay-off timers automatically shut your fan off after a specified time interval. It?s a nice feature in high traffic bathrooms where you may wish to let the fan run to clear moisture adequately. A timer counts down the minutes of fan operation selected by the user.
Where should the exhaust fan be located?
Exhaust fans should be located in or near the shower or tub, and in an enclosed water closet. Keep exhaust points opposite the supply air source to ensure that the fresh air is drawn through the room. Bathroom doors should not be sealed too tightly at the bottom in order to allow "makeup air" to enter the room when the door is closed.

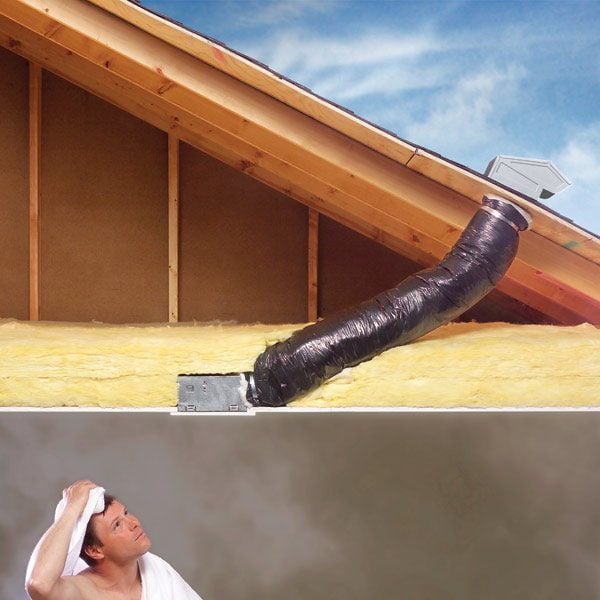
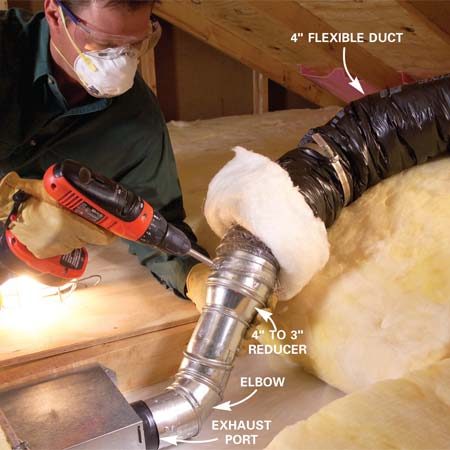
Where is the exhaust outlet on the ventilation fan?
The exhaust outlet is the point where air is discharged through the body of the fan housing into the ductwork. During installation, orient your fan with the exhaust outlet pointing toward the exit vent on your roof or wall to minimize turns in ductwork that impede airflow.
Why do the windows and mirrors fog even when the fan is running?
If windows and mirrors are very cold, condensation can still form on these surfaces. And if your bathroom is sealed tightly, replacement air may not be entering the room fast enough to displace the moist air. Be sure to undercut your door sufficiently to draw fresh air into the room. Fan placement can also be a factor. Your fan should be located far from the replacement air source to ensure the moist air is drawn out first. Finally, too many twists and turns in the ducting will significantly reduce the ability of the blower to remove moist air. Make sure your ductwork is as short and straight as it can be, with gradual turns rather than tight corners where necessary.
Why is water dripping from the grille of the fan?
Dripping water is either condensation (usually due to cold ductwork or improper duct installation), or a problem with the seal on a wall or roof vent. Insulated ductwork can help solve condensation problems, and running the fan longer will ensure moisture is completely removed from the duct. Ductwork should slope down toward a wall vent to direct condensation out of the exterior vent opening rather than back into the fan housing.
Can I install a heater over the bathtub or in a shower?
No. Heaters are not UL Listed (Underwriter's Laboratory) for installation over a bathtub or in a shower.

Can I use an inline or multi-port fan in one large bathroom?
Yes, this works the best for large rooms because you can install the ports over the areas where the ventilation is needed the most (source control). The size of the multi-port would be determined by the size of the room.
Does a duct-free bath fan expel air?
No. A duct-free fan is not a ventilating device. It does not remove air from the room.
What type of exhaust fan is recommended for hot tub areas?
A high CFM rated device is normally recommended for this type of application.
Can I use a smaller diameter duct than what the fan is designed for?
This is not recommended. It will cause the fan to run harder, greatly reducing the CFM performance of the fan and create excess noise.

Can larger diameter ducting be used with my bath fan?
Yes, larger diameters will result in improved performance.
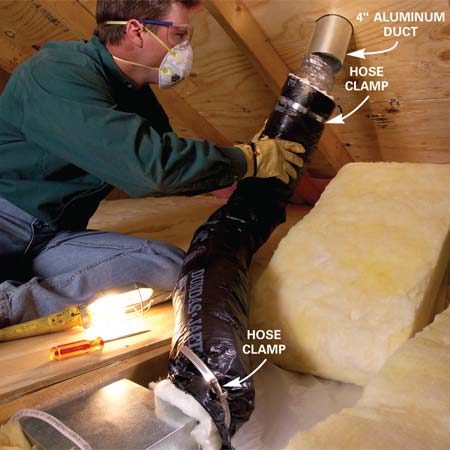
What type of duct is recommended, rigid or flexible?
It is recommended, where possible, to use rigid duct. It has less resistance to air flow and allows the fan to operate much more efficiently. If flexible duct is used, be sure the duct is as straight as possible.
Can I exhaust my fan into my attic instead of out the roof or wall?
Never exhaust air into spaces within walls, ceilings, attics, crawl spaces or garages. The humidity may damage the structure and insulation.
What type of exhaust fan is best for a sauna or hot tub area?
High CFM-rated devices are normally recommended for this type of application.

Can I use a fan in a steam shower?
No. Since these are normally sealed chambers, a vacuum will be created.
Can I vent more than one bath fan out of a roof or wall cap?
No. Always follow the manufacturer's recommended ventilation requirements.

Thursday, April 14, 2011

Upgrade Kits

Broan Bath Fan Upgrade Kit

Broan Bath Fan Upgrade Kit
 
Do you have an old, ugly, noisy, worn-out Broan or Nutone bath fan?  Now it's easy to replace the old bath fan with Broan's Model #690 Bath Fan Upgrade Kit.  The upgrade kit will move more air and is quieter than the old model too.
Features
  • No re-wiring
  • No new duct work
  • No hassels
  • New motor (60 CFM and 3.0 Sones) reduces sound up to 50%, improves air movement up to 20%, and helps control humidity that causes mold and mildew
  • New grille - Upgrade your bathroom's look with a modern white grille (can be painted)
  • No special tools are required - kit includes everything you need
  • Two motor plates included to fit most economy fans

Broan 690 Upgrade Kit replaces the models below:
If your grille looks like this:
 
The fan is very likely one of these models:
 
Housing Dimensions:
Broan
670, 671, 688, 689

Nautilus
N671, N688

7-1/2"x7-1/4" only
* 8" x 8-1/4" are not compatible

NuTone
693, 695, 696N
7-1/2"x7-1/4"
or
8"x7-1/4"

Broan 690 Upgrade Kit replaces the models below:
If your grille looks like this:
 
The fan is very likely one of these models:
 
Housing Dimensions:
Broan
670, 671, 688, 689

Nautilus
N671, N688

7-1/2"x7-1/4" only
* 8" x 8-1/4" are not compatible

NuTone
693, 695, 696N
7-1/2"x7-1/4"
or
8"x7-1/4"
More Information:

  • Model: 690
  • Manufactured by: Broan

Thursday, March 24, 2011

How To Replace a Bathroom Grille


In this video clip we will be replacing a bath fan grill. In this bathroom we have a ventilation fan located on the ceiling. Now there's an old 1980's yellow colored grill covering this fan. In addition to it being old and yellow there is a lot of dust and other types of debris that have collected in it over the years. We're going to be replacing this with a new clean grill. Our first step is to pull the grill straight down. It's attached by springs and you'll pull down and you'll be able to pivot it. Next we will need to disconnect our spring. There's a spring on both sides so make sure you take both of those off. After that we need to vacuum out our fan unit. After that we can put our new grill in place and push it straight up. That one looks much better than the old one and it should function a lot better because we did vacuum that out as well.


Monday, March 21, 2011

How to Repair a Door Chime
Repair a Door Chime
 

If your door chime no longer provides the familiar tones and merely hums or buzzes, you can probably fix it without too much trouble. Try this before replacing it.

Steps
1
Remove the cover of the chime unit. Many times this cover will just hang on some tabs and can be removed by lifting it straight up. Other types may require that screws be loosened or removed.
2
Look for obviously broken or missing parts. Reinstall if possible. Springs and plungers are basically the only moving parts for electro-mechanical chime units.
3
Tighten electrical terminal screws. Most units operate at 24 volts or less, and should not pose a shock hazard. You can determine this by looking at the wires. If the wires look to be closer in size to telephone wire - or low voltage thermostat wire, it is most likely the 24 volt (or less) type. Low voltage door bell circuits usually originate at a small 120 volt to 24 volt (may be any value between 12 and 24 volts) transformer connected to the side of electrical panel. The presence of a transformer is also a good indication, too. In any case, treating the wiring as if it was line voltage (120 volts) will help prevent getting hurt.
4
Listen carefully and then observe the moving parts while an assistant presses the door bell button several times. A faint buzzing sound or slight movement confirms that the chime unit is getting powered.
5
Check and tighten the electrical points (fuses and circuit breakers, terminal screws of the door bell button(s), and transformer) if unable to hear or see the indications above and try again. If still unable to hear or see the indications above, just continue following the steps below.
6
Check the plunger for freedom of movement. Gently push / pull the plunger(s). It may move only in one direction, but may move in both. If unable to move the plunger, or it moves but does not "spring back" into position, it is likely hanging up on dirt, dust, etc.
7
Clean the moving parts of the chime unit. Do not use any kind of lubricant. No oil, no WD-40, no graphite powder, and no silicon spray. These may work for a short time, but will quickly attract dust and grime and gum up the plungers.
8
Cleaning can be done in place or removed from the wall. Either way will require safeguarding the area from dirt, solvents, etc. If removing from wall, label the wires and terminals before disconnecting.
9
Spray a short blast of electrical contact cleaner at the moving parts. Do not be surprised to see dirty contact cleaner dripping out of the mechanism. Attempt to move the plunger again. Continue to spray bursts while moving the plunger. The idea is to flush out any dirt, etc that has collected around the metal plunger body.
10
Once the plunger is able to move freely, the chime unit is ready to be reconnected and tested by pressing the door bell button.
11
Compare the voltage rating of the chime (likely 12 to 24 volts) with the rated voltage output stamped on the transformer. These values must match. Replace either the chime or transformer so that the two have matching voltage values. Most doorbell transformers are marked with AC voltage, but also have a 25 VA (watts) rating -- do not confuse VA with AC volts.
12
Remove wires from door bell buttons and touch wires together. If chime works, replace door bell buttons.

Friday, March 11, 2011

Repairing your Bathroom Fan. Easier than you think!

How to Repair a Bathroom Fan
Fix your bath fan without replacing the entire unit and improve air flow with a first class vent system. You can replace a dead motor without tearing out the ceiling and replacing the whole thing. You can also improve venting and prevent roof rot by running the vent through the roof, and not leave it in the attic as was done by many contractors.
Both improvements are easy. This article shows you how.
Replace a dead motor
If your bathroom fan is dead, here's some good news: You don't have to tear out the entire unit. Even if you fan is decades old, chances are you can get a replacement motor. Although a new motor costs about the same as a new fan, replacement saves time and trouble. You don't have to cut into the ceiling, crawl around your attic or get up on your roof. It usually takes less than an hour.
Your first step is to get the fan's model number. Remove the fan grille (Photo 1) and vacuum away the dust to find the number on a label or stamped on the fan’s housing. But don't order a new motor until you remove the old one. You might need other parts too.
Bath fans vary in design, but motor replacement requires the same basic steps, no matter which brand or model you have. Turn off the power to the fan at the main breaker panel. Then unplug the fan and remove the motor plate (Photo 2). Some motor plates release by pressing or prying on the side of the fan housing. Others are secured with a screw or two.
Before you can remove the motor from the plate, you have to get the blower off the motor's shaft. This is often the toughest part of the whole project. An older metal blower might be fastened with a screw. Plastic blowers usually aren't fastened at all, but simply slide off the shaft. Either way, removal may require some hard prying and pulling. If you wreck the blower while removing it, don't worry. You can order a replacement at little cost. To install the new motor, simply reverse the removal process.

Run duct outside to prevent roof rot

When there's an attic above the bathroom, some installers take a shortcut: Instead of running the duct through the roof, they end the duct inside the attic. The result is that the fan fills the attic with moist air. That moisture feeds wood rot. In winter, frost forms in the attic and as the frost melts, water can damage the ceilings below.
If you don't have a cap on your roof like the one shown in Photo 2, chances are your bath fan vents into the attic. Running a new duct up through the roof isn't a complex job, but you will have to work in the attic and on the roof. Since you're doing all that work anyway, consider replacing the fan.
An attic can get dangerously hot in summer, so work on a cool day. Wear a dust mask and eye protection. Bring a trouble light and a large scrap of plywood to use as a work platform. Here's how to do the job with only two trips to the attic: On your first trip, measure the exhaust port diameter and pick a spot near the fan where you want the duct to exit the roof. Drive a screw up through the roof so you can find the location from outside. Then head over to http://www.storeforparts.com/ 

Here is what you need.

A roof vent cap.
  • Aluminum duct the same size as the flexible duct. You only need about 6 in., so buy the shortest section available and cut it with a metal snips.
  • Two 6-in. hose clamps.
  • One tube of roofing cement.
  • Roofing nails and 1/2-in. sheet metal screws.
  • Flexible, insulated duct. Insulation prevents condensation from forming on or inside the duct. Home centers often carry only 4-in. insulated duct. If your fan has a 3-in. port, you can still use 4-in. duct by attaching a 3-in. elbow and a 3 x 4-in. reducer with sheet metal screws as shown in Photo 5.
Install the roof vent cap as shown in Photos 1 – 4. Photos 5 and 6 show how to finish the job in the attic.